You fix drywall holes before painting by filling small nail holes with spackle, patching medium holes with a self-adhesive mesh patch and joint compound, and cutting in new drywall for large holes over 6 inches. Every patched area must be sanded smooth, primed, and then painted for a seamless finish. According to HomeAdvisor, the average cost of professional drywall repair is about $610, though small DIY patches can be done for as little as $10 to $50 in materials. Skipping this step before painting leads to uneven surfaces, visible bumps, and paint that peels or bubbles over the repaired spot. This guide walks homeowners in Lexington, SC, and across the Columbia area through every type of drywall repair so your walls are smooth, solid, and ready for a flawless paint job.
How Do You Fix Holes in Drywall Before Painting?
You fix holes in drywall before painting by matching the repair method to the size of the hole. Small holes from nails and picture hangers need only spackle and a putty knife. Medium holes from wall anchors or doorknob impacts need a self-adhesive mesh patch and joint compound. Large holes over 6 inches need a new piece of drywall secured with screws and finished with tape and multiple coats of compound. According to Family Handyman, patching is one of the most important prep steps before painting, and getting it right makes the difference between a professional finish and a messy one.
Every repair follows the same basic sequence: clean the damaged area, apply the filler or patch, let it dry completely, sand it smooth, and prime before painting. According to Behr, sanding with 220-grit sandpaper creates a surface that is level with the surrounding wall, and priming seals the repaired area so the topcoat goes on evenly. Skipping the sanding or priming step is one of the most common reasons patched areas show through the finished paint.
Homeowners in Lexington who are preparing for a full room repaint should walk through every wall and mark every hole, crack, dent, and imperfection with a small piece of painter’s tape before starting repairs. This makes it easy to find and fix every spot without missing any. A professional drywall repair and painting team does this assessment as part of every project.
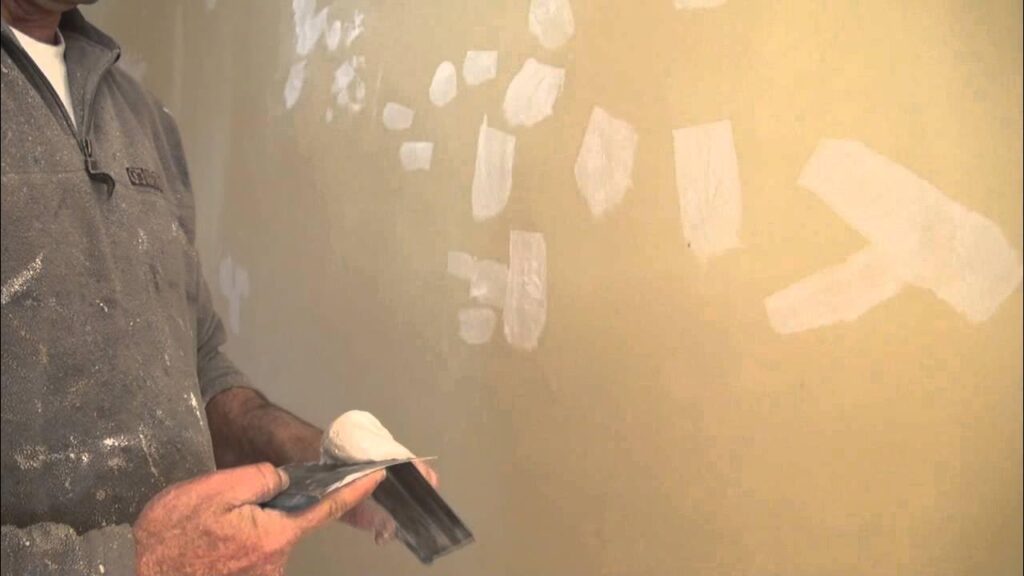
What Do Professional Painters Use to Fill Nail Holes?
Professional painters use lightweight spackling compound to fill nail holes. Spackle is a smooth, fast-drying paste that fills small holes cleanly and sands down to a perfectly flat finish. According to Family Handyman, professionals fill an entire row of nail or screw holes with one long stripe of joint compound rather than dabbing each hole individually, which saves time and produces a smoother result.
The technique is simple. Scoop a small amount of spackle onto a putty knife, press it firmly into the hole, and scrape the excess flat against the wall at a 45-degree angle. According to The DIY Playbook, most quick-dry spackle products are ready to sand in 30 to 60 minutes. After sanding with fine-grit sandpaper (220 grit), the repaired spot should be completely invisible to the eye and smooth to the touch.
According to Family Handyman, there is an important trick that most DIY homeowners skip: before filling a nail hole, use the rounded end of a putty knife handle or screwdriver to press a small dent into the wall around the hole. This creates a shallow depression that the spackle fills flush, rather than leaving a raised bump that shows through the paint.
For homes in the Lake Murray and Lexington area where walls have dozens of nail holes from hanging pictures and shelves, filling them all at once before painting is the fastest approach. Batch all your spackle work in one session, let everything dry, then sand the entire room at once before priming.
Is It Better to Use Spackle or Drywall Mud?
It is better to use spackle for small holes and drywall mud (joint compound) for larger repairs. Each product has a specific purpose, and using the right one for the job makes the repair faster, smoother, and more durable.
Spackle is a lightweight compound that dries quickly, shrinks very little, and sands easily. According to Fixr.com, spackle is the better choice for nail holes, screw holes, small dents, and shallow scratches because it fills small voids cleanly and is ready to sand in under an hour. It is not designed for large areas or deep repairs because it lacks the strength of joint compound.
Drywall mud, also called joint compound, is a thicker, stronger paste used for taping seams, covering mesh patches, and finishing larger repairs. According to Lowe’s, joint compound takes longer to dry (typically 12 to 24 hours per coat) but provides a stronger, more durable bond that holds up better over large surface areas. It is the standard material for any repair bigger than a quarter-sized hole.
For areas with many small dings and dents clustered together, like a mudroom or hallway, Family Handyman recommends a technique called skim coating. Mix a tablespoon of water into a few cups of “topping” or “all-purpose” joint compound to make it easier to spread, then skim the entire damaged area with a 6-inch putty knife. Scrape off the excess, let it dry, and sand smooth. Two or three thin coats fill everything evenly without leaving ridges.
Homeowners in Lexington who need both small fills and larger patches in the same room should keep both spackle and joint compound on hand. Using the right product for each repair size gives you the best results. If your walls need extensive patching, a sheetrock install and repair professional can handle everything from small fills to full panel replacement.
How Big of a Drywall Hole Can I Patch?
You can patch a drywall hole of any size, but the method changes as the hole gets larger. Holes under 1/2 inch are filled with spackle alone. Holes from 1/2 inch to about 6 inches use a self-adhesive mesh patch with joint compound. Holes larger than 6 inches require cutting in a new piece of drywall, securing it with screws and backing support, and finishing with tape and compound.
According to The DIY Playbook, self-adhesive mesh patch kits are the easiest repair for medium-sized holes. The mesh sticks directly to the wall over the hole and provides a reinforced surface for the joint compound to bond to. Two to three thin coats of compound, with sanding between coats, creates a smooth, invisible repair.
For holes larger than 6 inches, the California Patch method is a popular technique. According to Lowe’s, you cut a new piece of drywall slightly larger than the hole, score and snap the back paper and gypsum to leave a border of paper around the edges, then set the patch into the hole. The paper border overlaps the existing wall and acts like built-in tape. Apply joint compound over the seams, let it dry, and sand smooth.
Very large holes or damaged sections may need a piece of new drywall screwed into wood backing strips (called furring strips) that are inserted into the wall cavity. According to Lowe’s, these strips are secured to the existing drywall on either side of the hole, then the new drywall patch is screwed into the strips. Tape, compound, and sanding finish the job. This repair is structurally strong and lasts as long as the original wall.
Can I Paint Directly Over Spackle?
No, you should not paint directly over spackle without priming first. Spackle and joint compound are more porous than the surrounding painted wall, which means they absorb paint differently. According to Family Handyman, painting over unprimed patches causes “flashing,” where the repaired spots look dull, foggy, or a slightly different shade than the rest of the wall, especially in semi-gloss or glossy finishes.
Priming the patched area with a sealing-type primer blocks the porosity difference and creates a uniform surface for the topcoat. According to Family Handyman, self-priming spackle products are available that eliminate this extra step. Look for the words “self-priming” or “with primer” on the container. These products seal the repair as they dry, so you can paint directly over them after sanding.
If you are using standard spackle or joint compound, always apply a coat of primer over the dried, sanded repair before painting. A small brush or mini roller works well for spot-priming individual patches. If you are repainting the entire wall, priming the whole surface is even better because it creates a perfectly uniform base for the topcoat.
Homeowners in the Columbia area who are preparing walls for a fresh coat of paint should treat priming as a non-negotiable step. The few extra minutes it takes to prime each patch saves you from visible repair marks that ruin an otherwise beautiful interior painting job.
What Happens If You Don’t Prime a Drywall Patch Before Painting?
If you don’t prime a drywall patch before painting, the repaired area will absorb paint at a different rate than the surrounding wall, causing visible differences in sheen, color, and texture. This problem is called “flashing” and it is especially obvious under semi-gloss or satin finishes. According to Family Handyman, flashing makes patched areas look like dull, foggy spots on an otherwise smooth wall.
The reason is simple: dried spackle and joint compound are porous. They soak up the first coat of paint like a sponge, leaving less paint on the surface compared to the sealed, previously painted wall around it. The result is a patch that looks lighter or duller than the rest of the wall. Even multiple coats of paint may not fully fix the problem once flashing has occurred.
According to Oak City Coatings, priming is especially critical when using higher-gloss finishes because glossy paint amplifies every surface inconsistency. A sealing primer creates a barrier that equalizes the absorption rate between the patched area and the existing wall. After priming, the topcoat goes on evenly and looks identical across the entire surface.
For homeowners doing multiple repairs before painting, applying a single coat of primer to the whole wall is the easiest way to avoid flashing on any spot. This approach also helps old, faded paint accept the new topcoat more evenly. If the room needs serious wall work, a drywall repair and painting team handles priming as a standard part of the process.
Should I Use Tape or Mesh for Drywall Repair?
You should use self-adhesive mesh tape for most drywall repairs because it is easier to apply and provides strong reinforcement for joint compound. Paper drywall tape is better for inside corners and for repairs where a smoother, thinner finish is needed. Both products work well when applied correctly.
According to Lowe’s, self-adhesive mesh tape sticks directly to the wall and does not require a bed coat of compound underneath it. This makes it faster and simpler for DIY homeowners. Mesh tape is also more resistant to cracking because its open weave allows joint compound to grip through the holes, creating a strong mechanical bond.
Paper tape is the preferred choice of many professional drywall finishers for seams and inside corners because it creates a thinner, smoother finish. According to James Alexander Specialty Paints, paper tape requires a thin “bed coat” of joint compound applied to the wall first, then the tape is pressed into the wet compound and smoothed flat. A second coat of compound goes over the top after the first coat dries.
For patching holes, mesh tape is almost always the better choice because it provides a strong, reinforced surface for the compound to build on. For taping new drywall seams or repairing separated tape on existing joints, paper tape gives a cleaner, flatter result. Homeowners in Lexington tackling multiple repair types in the same room may need both products.
What Are Common Drywall Patching Mistakes?
The most common drywall patching mistakes are applying compound too thick, not sanding between coats, skipping primer, using the wrong product for the repair size, and rushing the drying time. According to Sherwin-Williams, using too much or too little compound results in an uneven finish that shows through the final paint job.
Applying compound too thick in one coat causes shrinking, cracking, and an uneven surface. According to Family Handyman, the key is to apply multiple thin coats, feathering the edges wider with each pass, rather than trying to fill everything in a single heavy layer. Each coat should dry fully before the next one goes on.
Not sanding between coats leaves ridges, bumps, and rough texture that will be visible under the paint. According to Behr, use 220-grit sandpaper and sand gently in circular motions to avoid oversanding and exposing the drywall paper underneath. Run your hand over the surface after sanding; if you can feel any edge or bump, sand more.
Rushing the drying time is another frequent error. According to ConstructEstimates.com, joint compound needs 12 or more hours to dry between coats. Spackle dries faster, usually in 30 to 60 minutes. Applying the next coat before the previous one is fully dry traps moisture and weakens the bond, which can cause the repair to crack or bubble later.
Using caulk instead of spackle to fill nail holes is a mistake many homeowners make. Caulk stays flexible and never fully hardens, so it creates a soft spot that sands poorly and shows through paint. Save caulk for gaps between trim and walls. Use spackle or compound for holes in the flat wall surface.
Can I Use Caulk to Fill Nail Holes in Drywall?
No, you should not use caulk to fill nail holes in drywall. Caulk is designed to fill gaps between two different surfaces, like where trim meets the wall or where a window frame meets drywall. It stays flexible after drying, which is great for joints that move slightly but terrible for flat wall repairs. According to Oak City Coatings, caulk is the correct choice for cracks where door frames, window frames, baseboards, or crown molding meet the drywall, but spackle is the correct choice for holes in the wall surface itself.
Caulk does not sand well. If you try to sand caulk flush with the wall, it gums up and tears instead of smoothing down. The result is a visible, uneven spot that stands out under paint. Spackle, on the other hand, dries hard and sands to a perfectly smooth, paintable finish.
The one exception is paintable caulk used for filling hairline cracks along trim joints and corner seams. These are not holes in the wall surface; they are gaps at the junction of two materials. Paintable acrylic latex caulk fills these gaps, stays flexible to absorb slight movement, and accepts paint cleanly.
For homeowners in the Red Bank and Gilbert areas who are prepping walls for a fresh coat of paint, keep both spackle and caulk in your toolkit. Use spackle for holes in the wall. Use caulk for gaps along trim and baseboards. The right product in the right place gives you a finished result that looks clean and professional.
What Kind of Primer Is Best for Repaired Drywall?
The best kind of primer for repaired drywall is a PVA (polyvinyl acetate) drywall primer for new or bare drywall, or a stain-blocking sealing primer like Zinsser Bulls Eye 1-2-3 or KILZ Original for patched areas that will be painted over. According to Family Handyman, sealing-type primers are essential for preventing flashing on patched spots.
PVA primer is the standard choice for new, unfinished drywall. It seals the porous surface of the gypsum and paper, creating a uniform base for paint. It is inexpensive and covers well, typically running $15 to $25 per gallon. According to Sherwin-Williams, a gallon of PVA primer covers about 200 to 300 square feet.
For spot-priming individual patches on an existing painted wall, a stain-blocking primer works best because it seals the porous compound and prevents bleed-through from stains, water marks, or old adhesive residue. According to This Old House, tinting the primer to about 80% of the topcoat color helps reduce the number of paint coats needed for full coverage, especially when going from dark to light.
Self-priming spackle products skip this step entirely. These products contain primer built into the compound, so they seal themselves as they dry. According to Family Handyman, self-priming spackle is a real time-saver for homeowners with many small repairs across multiple rooms.
How to Repair Ripped Drywall Paper Before Painting?
You repair ripped drywall paper before painting by sealing the torn paper with a coat of primer or drywall sealer, then covering it with a thin layer of joint compound, sanding smooth, and priming again before painting. Torn paper is a common problem that occurs when removing tape, adhesive hooks, or self-sticking picture hangers. The exposed brown paper underneath is very porous and will absorb paint unevenly if not sealed first.
According to Family Handyman, the first step is to carefully trim away any loose or raised pieces of paper with a sharp utility knife. Do not pull or peel the paper further; just cut away what is already loose. Next, seal the exposed paper with a coat of oil-based primer or shellac-based sealer like Zinsser B-I-N. This hardens the paper and prevents it from bubbling when you apply joint compound.
After the sealer dries, apply a thin coat of joint compound over the area with a putty knife, feathering the edges to blend with the surrounding wall. Let it dry, sand smooth with 220-grit sandpaper, and apply a second coat if needed. Once the final coat is dry and sanded, prime the entire repaired area with a sealing primer before applying your topcoat paint.
This type of damage is common in older homes throughout the Lexington and Columbia area where walls have been decorated and redecorated over the years. Properly sealing torn paper prevents the most visible and frustrating type of paint failure: bubbling, peeling, and uneven texture over damaged spots.
Can You Use KILZ on Torn Drywall?
Yes, you can use KILZ on torn drywall, and it is one of the best products for sealing damaged drywall paper before applying joint compound and paint. KILZ Original (oil-based) and KILZ Premium (water-based) both seal the exposed paper and prevent it from bubbling or absorbing unevenly when compound or paint is applied over it.
According to KILZ, their primer products cover roughly 250 to 350 square feet per gallon, depending on the surface porosity. On torn or damaged drywall, coverage will be on the lower end because the exposed gypsum and paper absorb more material. Apply a thin, even coat with a brush or small roller over the damaged area and let it dry completely before proceeding with compound application.
Zinsser B-I-N shellac-based primer is another excellent option for sealing torn paper. It dries faster than KILZ Original and creates a very hard, sealed surface. For large areas of damaged paper or walls with extensive adhesive residue, a full coat of sealing primer over the entire wall is the safest approach.
For homeowners in the Lake Murray area with walls that have multiple areas of torn paper from removed wallpaper or adhesive hooks, a sealing primer is an essential first step before any topcoat goes on. Without it, the damaged spots will telegraph through the finished paint and look noticeably different from the rest of the wall.
Drywall Repair Methods by Hole Size
| Hole Size | Repair Method | Materials Needed | DIY Cost | Pro Cost |
|---|---|---|---|---|
| Nail holes (under 1/4″) | Fill with spackle | Spackle, putty knife, 220-grit sandpaper | $5 – $15 | $20 – $120 |
| Small holes (1/4″ to 1″) | Spackle with mesh patch | Spackle, small mesh patch, putty knife, sandpaper | $10 – $30 | $75 – $150 |
| Medium holes (1″ to 6″) | Self-adhesive mesh patch + compound | Mesh patch kit, joint compound, 6″ putty knife, sandpaper | $10 – $50 | $150 – $350 |
| Large holes (6″ and up) | New drywall piece + backing + tape | Drywall piece, screws, furring strips, tape, compound, sandpaper | $20 – $80 | $300 – $800 |
| Cracks (hairline to wide) | Compound fill or tape + compound | Joint compound, paper tape, sandpaper | $10 – $30 | $100 – $400 |
| Torn drywall paper | Seal, compound, sand, prime | Sealing primer (KILZ/Zinsser), compound, sandpaper | $15 – $40 | $100 – $300 |
Sources: Angi ($20-$120 small holes, $295-$925 average range), HomeGuide ($300-$500 small pro repairs, $500-$800 large), HomeAdvisor ($610 average), The Smart Fix Handyman ($10-$135 small holes), Fixr.com ($75-$115 patching), ConstructEstimates.com ($100-$400 cracks)
What Does Adding Dawn Dish Soap to Drywall Mud Do?
Adding a small amount of Dawn dish soap to drywall mud makes the compound smoother, easier to spread, and less likely to leave ridges or drag marks. The soap acts as a surfactant that breaks the surface tension of the compound, giving it a creamier consistency that glides across the wall more easily. Many professional drywall finishers use this trick to achieve a glass-smooth finish on final coats.
The amount needed is very small. A few drops of dish soap per bucket of compound is enough. Too much soap weakens the compound and can cause adhesion problems. The goal is to make the mud feel silkier on the knife, not to change its chemical properties. This technique works best with “topping” compound, which is the lightest and smoothest type of joint compound used for final coats.
For homeowners doing small patches before painting, this trick is not necessary. It is most useful when skim coating an entire wall or doing large-area finishing work where the smoothest possible surface matters. For standard nail hole and patch repairs, using the compound straight from the container and sanding carefully after drying produces a perfectly good result.
Does Painters Putty Ever Harden?
Yes, painters putty does harden, but how hard it gets depends on the type. Lightweight spackling compound dries hard in 30 to 60 minutes and sands to a smooth, solid surface. Standard joint compound takes 12 to 24 hours to dry fully and hardens to a firm but sandable finish. Setting-type compound (sold as a powder that you mix with water) hardens through a chemical reaction and becomes very hard, similar to plaster.
According to Family Handyman, setting-type compounds like Durabond or Easy Sand are harder to sand than regular spackling or pre-mixed joint compound. They are best for repairs that need maximum strength, like backing for patches or filling deep holes. Because they set through a chemical reaction rather than just evaporation, they do not shrink as much as pre-mixed compounds and can be recoated much sooner.
Standard lightweight spackle hardens enough to sand and paint but remains softer than setting-type compound. It can be dented or damaged by a strong impact after it dries. For nail holes and small repairs, this level of hardness is perfectly fine. For repairs in high-traffic areas like hallways and kids’ rooms in Lexington homes, setting-type compound provides a tougher, more durable fill.
Is Spackle or Putty Better for Patching Holes?
Spackle is better than putty for patching holes in drywall before painting. Spackle is specifically formulated for wall repairs. It dries hard, sands smoothly, and accepts paint evenly. Painters putty (sometimes called glazing putty) is designed for filling wood grain or setting glass in window frames and does not perform well on drywall surfaces.
According to Fixr.com, spackle has a faster drying time and does not shrink as much as joint compound, making it ideal for small, quick repairs. It is ready to sand in 30 to 60 minutes for most quick-dry formulas. Joint compound, while better for larger repairs, takes much longer to dry and may require multiple coats.
For drywall work, skip glazing putty entirely and stick with either lightweight spackle (for small holes) or joint compound (for anything bigger than a quarter). Both are available at any hardware store in Lexington for under $10 per container. Using the right product saves time, produces a better finish, and prevents the patched area from showing through the paint.
How Much Does Professional Drywall Repair Cost?
Professional drywall repair costs between $150 and $1,800, with most homeowners spending about $610 on average. According to HomeAdvisor, the final price depends on the size and number of repairs, the location of the damage, and whether additional work like texture matching or painting is needed.
Small repairs like nail holes and minor dents cost $20 to $120 each, according to Angi. Medium holes from doorknob impacts or removed anchors run $150 to $350. Larger holes requiring new drywall, backing, and multiple coats of compound cost $300 to $800 or more. According to HomeGuide, drywall contractors typically charge $60 to $90 per hour, with labor making up 65% to 75% of the total repair cost.
For homeowners in the Lexington and Columbia area, combining drywall repairs with an interior painting project is the most cost-effective approach. According to HomeAdvisor, adding professional painting to a drywall repair runs $70 to $130 per hour or $2 to $6 per square foot. Bundling both services with one contractor saves on setup, travel fees, and overall project time.
If your home needs extensive wall repair along with a fresh coat of paint, a combined drywall repair and painting service delivers the best value and the smoothest results. A pro handles everything from patching and sanding to priming and painting in one seamless project.
How to Get a Smooth Wall After Patching for Painting?
You get a smooth wall after patching by applying thin coats of compound, sanding between each coat with fine-grit sandpaper, feathering the edges wider than the repair, priming the patched area, and then painting. According to Behr, the secret to an invisible repair is patience and thin layers, not one thick application.
Start with a thin first coat that fills the hole or covers the mesh patch. Let it dry completely. Sand lightly with 220-grit sandpaper using gentle, circular motions. Wipe away the dust with a damp cloth. Apply a second coat that extends 1 to 2 inches beyond the edges of the first coat. Let it dry and sand again. If the patch is for a large area, a third coat that extends even wider may be needed.
According to James Alexander Specialty Paints, the key technique is “feathering,” which means applying progressively thinner layers of compound as you move away from the center of the repair. The center of the patch should be flush with the wall, and the edges should taper to nothing. When done correctly, the transition between the repaired area and the original wall is undetectable.
After the final sanding, run your hand over the repair with your eyes closed. If you can feel any edge, ridge, or bump, sand more. Once the surface feels perfectly smooth, prime with a sealing primer and let it dry before applying your topcoat. Homeowners in Lexington who follow this process will achieve results that look every bit as good as professional work.
For homes that need wall repairs across multiple rooms before a full repaint, a professional house painting crew handles all prep, patching, priming, and painting as part of a single project.
Frequently Asked Questions
How Long Should I Wait After Patching Drywall Before Painting in Lexington?
You should wait until the patched area is completely dry and sanded smooth before painting. Quick-dry spackle is ready to sand in 30 to 60 minutes. Standard joint compound takes 12 to 24 hours per coat. In the humid climate around Lexington and Columbia, drying times may run longer, especially during summer. Check the product label for specific times, and make sure the patch feels dry and firm before sanding or priming.
Can I Paint Directly Over a Drywall Patch Without Priming?
No, you should not paint directly over a drywall patch without priming. According to Family Handyman, unprimed patches cause “flashing,” where the repaired area looks dull or a different shade than the surrounding wall. The patch absorbs paint at a different rate, creating a visible difference in sheen. Always apply a sealing primer over patched areas before painting, or use self-priming spackle that eliminates this step.
What Grit Sandpaper Should I Use for Drywall Repair?
You should use 120 to 150-grit sandpaper for initial sanding between coats and 220-grit sandpaper for the final pass before priming. According to Behr, 220-grit produces a smooth surface that is level with the surrounding wall without scratching the drywall paper. Sand gently in circular motions and check your progress frequently by running your hand over the surface.
How Do I Fix Nail Pops in Drywall Before Painting?
You fix nail pops by driving a new drywall screw 1.5 inches above the popped nail to resecure the drywall to the stud, then hammering the popped nail back flush. According to Lowe’s, sink the screw head just below the surface and cover both the screw and nail with spackling compound. Let it dry, sand smooth, prime, and paint. Nail pops are common in homes throughout the Lexington area as houses settle over time, especially in newer construction.
Is It Worth Hiring a Professional for Drywall Repair Before Painting?
Yes, it is worth hiring a professional for drywall repair if you have large holes, water damage, widespread cracking, or damage in hard-to-reach areas like ceilings or stairwells. According to HomeAdvisor, the average cost of professional drywall repair is $610, and professionals deliver a smoother, more durable finish than most DIY attempts. For small nail holes and minor dents, DIY repair is easy and affordable. For anything larger or more complex, a pro saves time and delivers better results.
What Causes Drywall Cracks in Homes Around Columbia, SC?
Drywall cracks in homes around Columbia, SC, are most commonly caused by normal house settling, temperature and humidity changes, and foundation movement. South Carolina’s clay-rich soil can expand and contract with moisture levels, putting stress on foundations that transfers to interior walls. Hairline cracks are usually cosmetic and can be filled with joint compound. Wide or recurring cracks may indicate a foundation issue that should be evaluated by a structural professional before making cosmetic repairs.
Can I Texture Over a Drywall Patch to Match My Existing Wall?
Yes, you can texture over a drywall patch to match your existing wall. Common textures like orange peel, knockdown, and skip trowel can be replicated using joint compound and the appropriate technique. Spray-on texture products from hardware stores in the Lexington area make matching orange peel and light knockdown textures fairly easy. Practice on a piece of cardboard first to match the pattern before applying it to the wall. For exact texture matching on larger repairs, hiring a professional is the best way to get an invisible result.
Final Thoughts
Fixing drywall holes before painting is the single most important prep step for achieving a smooth, professional-quality finish. Small nail holes need spackle and a putty knife. Medium holes need mesh patches and joint compound. Large holes need new drywall, backing strips, and multiple coats of compound. Every repair must be sanded smooth and primed before the topcoat goes on. Skipping any of these steps leads to visible patches, uneven sheen, and a paint job that looks rushed.
For homeowners in Lexington, SC, and the surrounding communities of Columbia, Red Bank, Gilbert, and Lake Murray, Soda City Painting handles all drywall prep, patching, priming, and painting as part of every interior project. From a single nail hole to a wall full of repairs, the right preparation makes every brushstroke count.
Ready to get your walls smooth, solid, and freshly painted? Call (803) 221-0771 or visit the interior painting services page to schedule your free, no-obligation estimate today. Great paint starts with great prep, and it all begins with one call.