Yes, you can fix water damaged drywall and repaint it, but only after you stop the source of the water, fully dry the affected area, and check for mold. Painting over water damaged drywall without addressing what caused the damage first is a guaranteed way to end up with the same problem in a matter of months. This guide covers every step of the repair and repaint process, what the signs of mold look like, which primers actually block water stains, when to replace rather than repair, and when to call a professional so the job is done right the first time.
How to Fix Water Damaged Drywall and Repaint: A Complete Guide
Water damage to drywall is one of the most common home repair issues homeowners in Lexington, SC face. According to Reliable Restoration, about 50% of homes in the United States experience some form of mold growth due to moisture issues. In South Carolina, where summer humidity regularly exceeds 70% and storm seasons bring sudden roof leaks and plumbing failures, drywall water damage is not a matter of if but when. The good news is that most water damaged drywall is repairable. The bad news is that the repair window is short. Act within 48 hours and repair is very likely possible. Wait longer, and mold changes the conversation entirely.
This article answers every question people are searching for, from “can water damaged drywall be repaired” to “what are the first signs of mold sickness,” so homeowners in Lexington, Red Bank, Gilbert, and the Lake Murray area know exactly what they are dealing with and what to do next.
Can Water Damaged Drywall Be Repaired?
Yes, water damaged drywall can be repaired in many cases, but whether it needs repair or full replacement depends on how long it was wet, how saturated it became, and whether mold has started to grow. According to My Pro Painters, if drywall gets wet once and is completely dry within 48 hours, it may not need to be replaced. However, even brief water exposure can weaken the material and allow mold spores to start developing. The key question is always timing.
Drywall that was exposed to water for less than 48 hours, is still structurally firm when pressed, shows no soft or spongy spots, and has no visible discoloration beyond surface staining can typically be dried out, repaired with joint compound, primed with a stain-blocking primer, and repainted. Drywall that has been wet for more than 48 hours, feels soft or crumbles when pressed, shows visible mold growth, or has a musty odor needs to be removed and replaced. According to C&B Complete, drywall that remains wet too long will lose structural integrity entirely, eventually crumbling into powder when pressed.
The physical test is simple. Press gently on the suspect area with the heel of your hand. Firm drywall that gives only slightly is a candidate for repair. Soft, spongy, or visibly bubbled drywall is already compromised and replacement is the right call.
Can I Paint Over Water Damaged Drywall?
No, you should not paint directly over water damaged drywall without completing the repair steps first. Painting over a water stain on drywall without using a stain-blocking primer will not hide the stain for long. Water stains contain minerals and organic material that bleed through standard paint in hours to days, even after multiple coats. The yellow or brown ring will come back through the fresh paint and look worse than before.
More importantly, painting over drywall that still has moisture trapped inside accelerates deterioration. The paint film seals moisture in rather than allowing it to escape, which encourages mold growth behind the surface. Homeowners across Lexington, SC who paint over water stains without proper prep end up with the same problem returning faster, with mold behind the wall in addition to a stained surface.
The correct sequence is: stop the water source, dry the drywall completely, assess for mold, repair any damaged sections, apply a stain-blocking primer specifically rated for water stains, and then paint. Skipping any of those steps guarantees the repair will fail.
How to Fix Damaged Drywall Before Painting
Here is how to fix damaged drywall before painting, broken down step by step from identifying the damage through the final coat of paint.
Step 1: Stop the Water Source First
Before touching the drywall, stop the water. This seems obvious, but it is the step most homeowners skip or underestimate. Whether the source is a roof leak, a plumbing pipe, an HVAC condensate drain, a window seal failure, or an overflowing appliance, the drywall will be re-damaged immediately if the source is not fixed. No primer and no paint will protect drywall that is still being fed moisture from above or behind. Fix the leak, confirm it is fixed, and then move to the next step.
Step 2: Dry the Affected Area Completely
Dry the wet drywall completely before any repair work begins. According to Abbotts Fire and Flood, a moisture meter is an inexpensive and essential tool for this step, available at hardware stores for around $40. A reading over 12% indicates wet drywall that needs additional drying. Use fans, dehumidifiers, and open windows to accelerate drying. In the humid Lexington, SC climate, drying without mechanical help takes significantly longer than in drier regions.
If the drywall has been soaked rather than just surface-wet, it may be necessary to open a section of the wall to dry the insulation and framing behind it. Wet insulation can hold moisture for weeks, feeding mold even after the drywall surface appears dry. According to Reliable Restoration, water-damaged insulation can lose up to 70% of its effectiveness and may need replacement alongside the drywall. Do not close up a wall cavity over wet insulation.
Step 3: Assess for Mold
Once the area is dry, check carefully for mold before applying any repairs. Look for fuzzy, discolored, or slimy patches on the drywall surface. According to Harvard Health, mold can appear as slightly fuzzy, discolored, or slimy patches that increase in size as they grow, and most molds produce a musty odor that is usually the first indication of a problem. If the surface has a musty smell but no visible growth, mold may be growing inside the wall cavity or on the back face of the drywall panel.
If visible mold covers an area smaller than 3 feet by 3 feet, the CDC states that homeowners can address it themselves by scrubbing with a bleach solution of one cup of laundry bleach per gallon of water, wearing rubber gloves and goggles, and allowing the surface to dry completely before any priming. If the mold covers an area larger than roughly 10 square feet, or if it has penetrated inside the wall cavity, professional mold remediation is the correct approach. Do not attempt to prime or paint over active mold. It will grow back through the primer.
Step 4: Remove and Replace Severely Damaged Sections
Cut out any sections of drywall that are soft, crumbling, heavily stained with brown or black discoloration, or visibly compromised. Use a utility knife or drywall saw to cut back to the nearest stud on each side of the damaged area. This gives you solid framing to attach the new panel to. Measure the opening, cut a replacement piece of drywall to fit, and secure it to the studs with drywall screws. For ceiling repairs, make sure the panel is secured to ceiling joists and not just floating between them.
For smaller damaged sections, self-adhesive mesh patch kits work well for holes and soft spots that do not require full panel replacement. These are available at any hardware store and include the mesh backing needed to support the joint compound over the repair area.
Step 5: Tape, Mud, and Feather the Seams
Apply drywall tape over all seams where the new panel meets the existing drywall, embedding the tape in a thin bed coat of joint compound. Apply two to three additional coats of joint compound, feathering each coat wider than the last to blend the repair into the surrounding wall. Allow each coat to dry fully before applying the next. In the Lexington, SC area, summer humidity slows drying time. A coat that would dry in four hours in a dry climate can take eight hours or more when indoor humidity is high.
Sand the final coat smooth with a medium-grit sanding sponge. The goal is a repair surface that is flush with the surrounding wall with no ridges or low spots. Check the work by holding a flashlight at a low angle across the surface. Any imperfections will cast a shadow and become obvious before paint goes on.
Step 6: Apply a Stain-Blocking Primer
This is the most important step that separates a repair that lasts from one that fails within weeks. Standard drywall primer will not block water stains. Water stains from leaks contain tannins, minerals, and organic matter that bleed through any paint that does not specifically contain stain-blocking chemistry.
For water stain coverage and mold prevention in one product, KILZ Restoration primer (formerly KILZ MAX) is the strongest water-based option, blocking heavy water stains, smoke, and odors while providing a mildew-resistant coating on the cured film. According to KILZ’s own product documentation, KILZ Restoration tackles heavy water damage, rust, smoke, and other tough stains that standard primers cannot handle. KILZ 3 Premium is a good choice for medium to heavy water stains with the added benefit of a very low VOC formula. KILZ Mold and Mildew primer is the right choice when the concern is preventing future mold growth on a surface that had minor staining but no active mold.
For the most severe stains, KILZ Original Oil-Based primer is the strongest stain blocker available and trusted by professionals for over 40 years, according to KILZ’s product specifications. It is more involved to apply and requires mineral spirits for cleanup, but it stops stains that water-based primers sometimes cannot. Apply the primer to the entire wall surface rather than only the repaired spot. Priming only the patch leaves a visible sheen difference once paint is applied.
| Primer Product | Best For | Stain Blocking Level | Mold Resistance |
|---|---|---|---|
| KILZ Restoration (water-based) | Heavy water stains, odors, severe damage | Maximum | Good |
| KILZ Original (oil-based) | Most severe stains, smoke damage | Maximum | Moderate |
| KILZ 3 Premium | Medium to heavy water stains, moisture-prone areas | High | Good |
| KILZ Mold and Mildew | Mold prevention, light to medium stains | Medium | Excellent |
| KILZ 2 All-Purpose | Minor water stains, general priming | Medium | Good |
| Zinsser Cover Stain | Water stains, single-coat coverage | High | Moderate |
Sources: KILZ product documentation; Brad the Painter; KILZ Natural Disaster Primer Guide
Step 7: Paint the Wall
After the primer is fully dry, apply two coats of interior paint. For bathrooms, kitchens, laundry rooms, and any other moisture-prone areas, choose a paint with built-in mildew resistance. According to the CDC, adding mold inhibitors to paints before painting is a recommended step for preventing future mold growth in areas of a home that are prone to moisture. Many premium interior paints include antimicrobial additives, but this can also be purchased separately and mixed in at the paint counter.
Paint the full wall rather than just the repaired section. A spot-painted repair almost always shows as a sheen difference or slight color variation under certain lighting, even when the color matches perfectly. A full wall coat blends the repair completely and gives the best result.
Will Mold Always Grow on Wet Drywall?
No, mold will not always grow on wet drywall, but it almost certainly will if the drywall stays wet for more than 48 hours. According to Pacific Flood Restoration, mold spores can begin to germinate after just 12 hours of wet conditions, and the 48-to-72-hour window is critical. The only reliable way to prevent mold after water damage is to dry the drywall completely within that window. According to My Pro Painters, mold will almost certainly occur if drywall remains wet for more than 48 hours.
Several factors accelerate or slow mold development. Warm temperatures between 77 and 86 degrees Fahrenheit are optimal for fast mold growth, according to Reset Restoration. Poor airflow, high humidity, and the presence of organic material like the paper facing on standard drywall all contribute. Homes throughout Lexington, SC that experience water damage during summer months face a much faster mold timeline than the same damage in January, because summer heat and humidity create near-ideal mold conditions. Once fungus takes hold on a drywall surface, it can spread at approximately one square inch per day and grow exponentially faster under optimal conditions, according to Reliable Restoration.
Is it bad if drywall gets a little wet? Minor surface moisture that dries within hours is generally not a problem. The paper facing may show a slight stain, but the drywall panel itself remains structurally intact and mold-free if drying happens quickly. The problem is not the wetness itself but the duration. A soaking that dries in six hours is very different from a slow leak that has been wicking moisture into a wall for three days.
How Long Does It Take for Mold to Start on Wet Drywall?
Mold can start growing on wet drywall in as little as 24 to 48 hours after water damage, according to the U.S. Environmental Protection Agency, as cited by Reset Restoration. Visible mold may not appear for two to four weeks, but the spores are germinating and colonizing inside the drywall material long before anything shows on the surface. This is why drywall that looks fine on the outside can already have active mold behind the paper facing and inside the gypsum core.
Mold grows fastest when warm temperatures, high humidity, poor airflow, and organic material are all present together. Drywall provides the organic food source (cellulose paper facing), and summer conditions in the Lexington area provide the temperature and humidity. Under those conditions, a water-damaged wall that is not addressed within 24 to 48 hours is almost certain to develop mold, even if nothing is visible for several more weeks.
The 48-hour rule applies to acting, not to visible results. The absence of visible mold in the first few days does not mean mold is not already present. If you know drywall has been wet for more than 48 hours, treat it as if mold is present until confirmed otherwise.
What Are the First Signs of Mold on Walls?
The first signs of mold on walls are a musty or earthy smell, discoloration in shades of black, green, gray, or white, and a fuzzy or slightly slimy texture on the surface. According to the New York State Department of Health, mold can appear as slightly fuzzy, discolored, or slimy patches that increase in size, and a musky odor is usually the first real indication of a problem. The smell often comes before visible growth because mold produces gases as it metabolizes organic material.
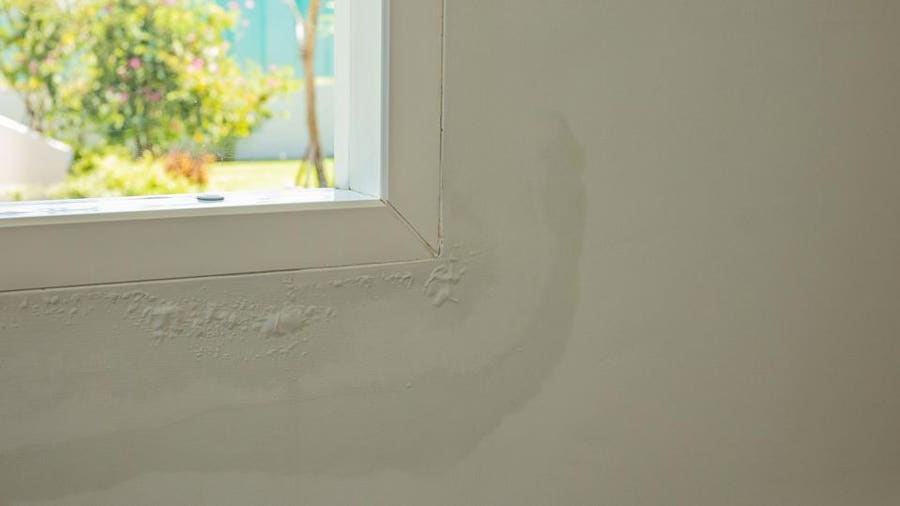
On walls that have had water damage, the first visible signs are often yellow or brown staining, paint or wallpaper that bubbles and peels away from the surface, or soft spots where the drywall has weakened. Baseboards that are swollen, warped, or pulling away from the wall are also a common early sign of moisture and mold behind the wall surface, according to AtmosAir. Mold growing inside wall cavities sometimes makes its presence known only through a persistent musty smell in a specific room with no other explanation.
In homes near the Lake Murray area, where summer humidity is consistently high, mold can also develop in closets and against exterior walls where warm indoor air meets cooler wall surfaces and condenses. These areas deserve extra attention after any water event.
How to Tell If Mold Is Behind Drywall
You can tell if mold is behind drywall by looking and smelling for these specific signs: a persistent musty odor in a specific area with no visible mold source, wallpaper or paint that bubbles, peels, or cracks along a specific section of wall, drywall that feels soft or spongy when pressed, visible discoloration seeping through the wall surface even after painting, and baseboards or trim that are warped or pulling away from the wall.
According to AtmosAir, bubbling paint or wallpaper on the baseboard and lower wall sections is a particularly telling sign because once the baseboard is removed, large amounts of hidden mold on the drywall and inside the wall cavity are often found directly behind it. If you suspect mold is inside the wall, the only way to confirm it is to cut a small inspection hole in the drywall in the suspect area and look inside with a flashlight. This is a reasonable first step before committing to tearing out a large section of wall.
Harvard Health recommends calling a professional if mold has gotten into drywall, ceilings, or floors, because the materials may need to be replaced and professional remediation ensures the mold is removed thoroughly rather than disturbed and spread. This is especially important in the Lexington area, where South Carolina’s humidity creates ideal conditions for mold to grow back quickly if any traces are left behind during an incomplete DIY removal.
Important: If you suspect mold behind a wall in your home, do not aggressively pry open or demolish the section without first sealing off the room with plastic sheeting. Disturbing active mold without containment releases spores into the rest of the house. For large or suspected extensive growth, contact a professional mold remediation company before doing any drywall work.
What Are the First Signs of Mold Sickness?
The first signs of mold sickness are allergy-like symptoms including a stuffy or runny nose, coughing, sneezing, watery or itchy eyes, sore throat, and skin irritation. According to the CDC, mold exposure can cause a stuffy nose, sore throat, coughing or wheezing, burning eyes, or skin rash, and people with asthma or mold allergies may have more severe reactions. The Institute of Medicine found in 2004 that there was sufficient evidence to link indoor mold exposure with upper respiratory tract symptoms, cough, and wheeze in otherwise healthy people.
A key indicator that symptoms are mold-related rather than seasonal allergies or a cold is location-specific worsening. According to Ohio State Health, if you have persistent congestion and coughing in a specific area of your home but feel better when you leave, that pattern is a strong sign that mold in that space is the cause. Mold-related symptoms tend to be worst in the rooms closest to the affected drywall or wall cavity.
According to Mayo Clinic, mold allergy symptoms range from mild to severe and can include runny or stuffy nose, cough and postnasal drip, itchy eyes, nose and throat, and dry itchy skin. For people with asthma, mold exposure can trigger attacks, cause chest tightness, and produce shortness of breath that requires immediate medical attention. If anyone in a Lexington, SC home is experiencing these symptoms alongside visible or suspected mold, removing the mold and stopping the moisture source is the health priority. Consult a healthcare provider if symptoms are severe or do not improve after mold removal.
What Kills 100% of Mold?
No single product kills 100% of mold in all situations, and it is important to understand what products can and cannot do. For surface mold on non-porous materials, a bleach solution of one cup of laundry bleach per one gallon of water is what the CDC recommends for cleaning mold from hard surfaces. The bleach kills live mold cells on the surface it contacts, but it does not penetrate porous materials like drywall deeply enough to kill mold growing inside the material. For mold in porous drywall, the only reliable solution is removal and replacement of the affected panel.
Mold-killing primers like Zinsser Mold Killing Primer are designed to prevent mold from growing on a primed and painted surface, not to kill active mold colonies already present. According to KILZ’s own product documentation, mold or mildew on surfaces must be washed off and the surface must be dry before any primer is applied. Primer is not a substitute for mold remediation. It is a preventive coating for clean, dry surfaces.
The most effective approach to eliminating mold is to remove the moldy material, clean surrounding surfaces with an appropriate solution, ensure the area is completely dry before closing it up, and then prime with a mold-inhibiting primer before finishing with mold-resistant paint. This combination does not kill 100% of mold spores because mold spores are present in every environment. What it does is remove the active colony, eliminate the conditions for re-growth, and protect the new surface from future mold development.
Is It Cheaper to Fix or Replace Drywall?
It depends entirely on the extent of the damage. For small to moderate water damage that is caught early, fixing is cheaper than replacing. According to HomeAdvisor data cited by Abbotts Fire and Flood, drywall repair costs about $500 on average, with a typical range of $250 to $750. Full drywall replacement for a larger damaged area, including removing the old panels, installing new drywall, taping, mudding, texturing, and repainting, costs significantly more. Repair is almost always the right choice when the drywall is structurally sound, fully dried, and free of mold.
Replacement becomes the cheaper long-term choice when the drywall has been wet for more than 48 hours, when it is soft or crumbling, when mold has penetrated the panel, or when the damage covers a large area. Patching compromised drywall may look fine initially but will fail again within months. Replacing it properly costs more upfront but does not need to be done again. According to C&B Complete, delaying repair on small water damage events can escalate costs from a few hundred dollars to $2,000 to $10,000 when mold remediation becomes required alongside the structural repair.
More than 60% of homeowners wait too long to fix small leaks, according to C&B Complete, turning a manageable repair into a much larger project. In the Lexington, SC area, where summer heat and humidity accelerate mold growth, the cost of waiting is especially high. Speed is the single biggest factor in keeping a water damage repair on the inexpensive end of the range.
For homeowners who want the assessment and repair handled by a professional crew that handles both the drywall and the final finish painting in one visit, the drywall repair painting service from Soda City Painting covers exactly that scope across Lexington, Columbia, Red Bank, and Gilbert.
Can You Use Kilz on Torn Drywall?
Yes, you can use KILZ on torn drywall paper, but the torn area needs to be properly prepared first for the primer to bond well and for the final painted surface to look right. When drywall paper tears or lifts, whether from water damage, rough patching, or removing tape, the exposed gypsum core underneath absorbs paint and primer at a very different rate than the paper face. This causes visible differences in sheen and texture in the finished paint, a problem called flashing.
To fix torn drywall paper before priming, apply a skim coat of joint compound over the torn area, feather the edges smooth, and sand flat once dry. This gives the primer a consistent surface to bond to. Then apply KILZ or another stain-blocking primer over the entire repair area. According to Brad the Painter, KILZ is one of the most trusted stain-blocking primers for drywall repairs, particularly for handling water stains and sealing torn paper before topcoat is applied.
KILZ Original Oil-Based primer provides the best bond and stain-blocking performance on torn or highly porous drywall surfaces. For water-damaged torn drywall where mold is also a concern, KILZ Restoration is the appropriate water-based choice that handles both the stain and provides a mildew-resistant film on the cured surface.
After the repair and primer are done, a professional crew that handles interior painting can finish the repair area with seamless texture matching and a full wall paint coat that makes the repair completely invisible.
What Is the Best Primer for Water Damaged Walls?
The best primer for water damaged walls is KILZ Restoration for heavy stains and water damage combined with odor concerns, or KILZ 3 Premium for medium to heavy water stains in occupied homes where low VOC and fast dry time are priorities. For areas with active mold that has been cleaned and dried, KILZ Mold and Mildew primer provides the best protective barrier against future growth on the new surface.
According to KILZ’s natural disaster primer guide, KILZ Restoration is a water-based primer, sealer, and stain blocker that blocks tough stains from heavy water damage and seals against unwanted odors, and can be used on drywall, wood, plaster, masonry, and brick. Zinsser Cover Stain is another strong option for water stains that Brad the Painter notes will likely handle any water stain in one coat at a lower cost than some alternatives.
The critical rule is to never use standard drywall primer or paint-and-primer-in-one products on water-stained surfaces. Those products are not formulated to block mineral and organic stains and the brown or yellow ring will bleed back through every coat of paint applied over them. Always match the primer to the specific stain type, and apply it to the full wall surface rather than just the stained spot for a uniform final appearance.
Homes throughout Lexington, SC that have gone through water damage events often benefit from having a professional assess the full scope of repair needed before starting. The sheetrock install and repair services provided by Soda City Painting handle everything from cutting out damaged panels to seamless texture matching and painting, so the result looks like the damage never happened.
Frequently Asked Questions
Can I Paint Over a Water Stain in Lexington, SC Without Priming First?
No, you cannot paint over a water stain in Lexington, SC without priming first with a stain-blocking primer. Standard paint and standard drywall primer do not block the mineral and organic compounds in water stains, so the brown or yellow ring bleeds back through within days to weeks regardless of how many coats of paint are applied. In South Carolina’s high humidity, the stain can return even faster because moisture in the air interacts with the unsealed residue in the wall. KILZ Restoration, KILZ 3 Premium, or Zinsser Cover Stain applied before topcoat is the correct approach for any water stain, regardless of its size or how old it is.
How Long Does Water Damaged Drywall Take to Dry Before Repainting in the Lexington Area?
Water damaged drywall in the Lexington, SC area typically takes longer to dry than in drier climates because of the region’s high ambient humidity. With fans and dehumidifiers running, most surface-wet drywall dries within 3 to 5 days. Drywall that has been deeply saturated or that has wet insulation behind it can take 1 to 2 weeks or more to reach the moisture meter reading of under 12% that indicates it is ready for repair and priming. Never rush this step. Painting over drywall that reads over 12% moisture with a meter, or that still feels slightly cool to the touch compared to surrounding areas, is a common cause of paint failure and mold recurrence in repaired walls.
Will Mold Always Grow on Wet Drywall in South Carolina’s Humid Climate?
Mold will almost certainly grow on wet drywall in South Carolina if the drywall stays wet for more than 48 hours. According to Reliable Restoration, mold can start growing on wet drywall within 24 to 48 hours, and South Carolina’s warm temperatures and high summer humidity create near-optimal conditions for rapid mold development. The 48-hour window is the critical threshold. Drywall dried within that time frame may not develop mold. Drywall that remains wet longer, especially during the summer months in Lexington, Red Bank, and the Lake Murray area, needs to be treated as potentially mold-contaminated even before any visible growth appears.
Is It Cheaper to Fix or Replace Water Damaged Drywall?
Fixing is cheaper when the damage is caught early, the drywall is structurally sound, and no mold is present. According to HomeAdvisor data, average drywall repair costs about $500, while delayed repairs that require mold remediation alongside structural replacement can escalate to $2,000 to $10,000. Replacement becomes the right choice when the drywall is soft, crumbling, or heavily mold-contaminated. The most important factor in keeping costs low is acting quickly. More than 60% of homeowners wait too long to address small leaks, according to C&B Complete, which consistently turns inexpensive repairs into much larger projects.
What Are the First Signs of Mold Sickness I Should Watch for After Water Damage?
The first signs of mold sickness to watch for after water damage in your home are a stuffy or runny nose, persistent coughing, sneezing, watery or itchy eyes, skin irritation, and a sore throat that does not resolve with normal cold remedies. According to the CDC, mold can cause a stuffy nose, sore throat, coughing or wheezing, burning eyes, or skin rash. A key indicator that these symptoms are mold-related is location-specific worsening: symptoms are worse in specific rooms, especially those nearest to the water damage, and improve when you leave the home. If you or any family members experience symptoms that worsen at home and improve when away, address the mold issue immediately and consult a healthcare provider.
Do Professional Painters in Lexington Handle Water Damaged Drywall Repairs?
Yes, professional painting and drywall repair companies in Lexington, SC handle water damaged drywall repairs that include patching, texture matching, stain-blocking primer application, and final paint. For homeowners who want the complete repair and refinish done by an experienced crew rather than managing the process themselves, a local professional handles all of it in fewer visits with results that are seamless and long-lasting. Soda City Painting serves Lexington, Red Bank, Gilbert, and the Lake Murray area and handles drywall repair painting as a dedicated service. Call (803) 221-0771 for a free estimate.
Can Water Damaged Drywall Be Repaired Before a Home Sale in Lexington?
Yes, water damaged drywall should absolutely be repaired before a home sale in Lexington, SC. Water stains, soft spots, and musty odors are among the most common items flagged during buyer home inspections and can derail a sale or result in significant price reduction requests. A properly repaired, primed, and repainted wall shows no evidence of the damage and removes buyer concerns entirely. For sellers preparing a home in the Lexington or Lake Murray area, addressing water damage before listing is one of the highest-return pre-sale improvements available.
Water Damage Does Not Have to Mean Permanent Damage
The key is acting fast and doing the repair correctly. Drywall that is dried, patched, sealed with the right primer, and painted properly looks and performs as good as new. But the process has to be done in the right order with the right products, and the time window matters.
Homeowners across Lexington, Red Bank, Gilbert, and the Lake Murray area trust Soda City Painting for water damage drywall repair and repainting that is seamless, long-lasting, and done right the first time. The crew handles the full scope from damaged panel removal through texture matching and final paint, so there is no visible evidence the damage ever happened.
Call (803) 221-0771 or visit the drywall repair and painting page to get a free estimate. The sooner water damage is addressed, the less it costs and the better