Yes, you can paint trim and baseboards without tape, and most professional painters prefer it that way. Skipping tape saves time, reduces waste, and can actually produce a cleaner edge when done right. The secret is using the right brush, loading it correctly, and moving at a slow and steady pace. This guide covers every technique professionals use, from freehand cutting in to the drywall scraper trick, plus common mistakes to avoid so your trim looks sharp and crisp in every room of your home.
Can You Paint Trim Without Taping?
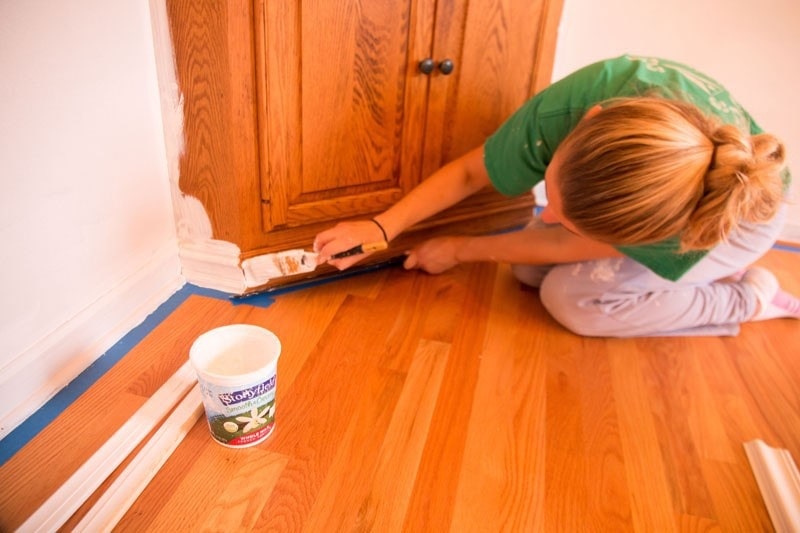
Yes, you can paint trim without taping, and most seasoned painters do exactly that. Painter’s tape takes time to apply correctly, and it still bleeds if you press the brush too hard or if the tape does not seal perfectly against an uneven wall surface. Freehand cutting in, when done with a good angled brush and a steady hand, consistently delivers cleaner results in less time.
According to a 2025 industry report, the U.S. house painting market was valued at $24.4 billion in 2024, and the residential segment is one of the fastest-growing categories. A big part of that growth comes from homeowners investing in fresh interior finishes, including trim and baseboards, because they know the payoff is real. According to data from Angi, interior painting delivers an average return on investment of 107%, meaning homeowners typically get back more than they spend.
Trim work is a major part of that visual impact. Clean, freshly painted baseboards frame a room the same way a sharp picture frame finishes a painting. When the trim looks great, the whole room looks polished and well cared for. That is true whether you are refreshing your home in Lexington, SC, or getting ready to list it on the market.
Professional painters across the country go tapeless on the vast majority of interior trim jobs. The reason is simple: freehand cutting in is faster, and with practice, it produces a sharper line than tape ever could. The key is preparation, the right tools, and a slow hand near the edges.
Homeowners who want a fully finished look often pair trim painting with interior painting services that cover walls, ceilings, and all millwork at the same time, which keeps finishes consistent throughout the space.
What Is the 7% Rule for Baseboards?
The 7% rule for baseboards says that your baseboard height should equal roughly 7% of your room’s total ceiling height. For a standard 8-foot ceiling, that means a baseboard of about 6 to 7 inches looks best. For a 9-foot ceiling, aim for around 7.5 inches, and for a 10-foot ceiling, about 8 to 8.5 inches is ideal.
This guideline comes from interior designers and architectural proportions that have been used for decades to make rooms feel balanced and complete. Most builder-grade homes come with baseboards in the 3 to 4.5-inch range, which can look small and insignificant next to tall walls. Upgrading to a taller baseboard and giving it a crisp coat of semi-gloss paint is one of the quickest ways to make a room feel more finished and high-end.
In Lexington, SC homes, especially those near Lake Murray where open floor plans and taller ceilings are common, a well-proportioned baseboard makes a real difference. Paired with fresh wall color, the right baseboard height and a clean paint job can completely transform how a room feels without any major renovation work.
The 7% rule also applies when choosing door and window casing widths. A good design guideline is that vertical trim pieces like door casings should be about 50% of the baseboard height. So if your baseboard is 6 inches tall, your door casing should be around 3 inches wide. Keeping these proportions consistent throughout a home gives the interior a polished, professional look.
How Do Painters Get a Straight Edge?
Painters get a straight edge by using a high-quality angled sash brush, loading it with the right amount of paint, and moving slowly along the edge with a confident stroke. The technique is called “cutting in,” and it is one of the core skills every professional painter develops early in their career.
The brush is the most important tool here. A 2-inch or 2.5-inch angled brush gives you control and flexibility. The angled bristles let you guide the paint right to the edge of the trim without splashing onto the adjacent surface. You dip the brush about halfway into the paint, tap off the excess against the inside of the can, then drag the brush along the line using the bristle tips to feather the edge.
The trick most beginners miss is brush loading. Too much paint on the brush causes drips and runs. Too little means you press harder to get coverage, which pushes paint in directions you do not want it to go. The right amount of paint lets the brush glide smoothly and gives you full control over where the edge lands.
Professional painters also use good lighting. A bright work light positioned low and angled at the baseboard or trim reveals any drips or uneven lines before the paint dries. Catching a mistake while the paint is still wet takes five seconds to fix. Catching it after it dries takes a lot more effort.
What to Use Instead of Tape for Painting?
Instead of tape, painters use three main tools: a high-quality angled sash brush for freehand cutting in, a wide drywall scraper or putty knife held flat against the wall to shield it while painting the baseboard, and in some cases a flexible paint shield or cardstock slid under the baseboard to protect carpet or flooring.
The drywall scraper method became widely popular after a viral video by contractor Fabian Mendoza demonstrated the technique. You hold a wide scraper flat against the wall just above the baseboard, paint the top edge of the baseboard with your brush, and then slide the scraper along as you move down the length of the board. The metal edge acts as a moving barrier, keeping the brush from touching the wall. This method works especially well on smooth drywall surfaces.
For areas where carpet meets the baseboard, sliding a piece of cardstock or a thin plastic paint shield between the carpet pile and the trim protects the carpet without any tape at all. You pull it along the floor as you work, which keeps the motion fluid and the job moving fast.
Can I Use Vaseline Instead of Painter’s Tape?
Yes, you can use Vaseline instead of painter’s tape in some situations. Applying a thin layer of petroleum jelly to surfaces you want to protect, like door hardware, hinges, or glass pane edges, creates a barrier that keeps paint from bonding. When the paint dries, the Vaseline wipes away cleanly, taking any accidental paint splatters with it.
This trick is not ideal for long wall edges or sharp baseboard lines, because Vaseline does not give you a crisp, defined boundary the way a brush or scraper technique does. It works best as a protective coating on hardware, fixtures, and small detail areas you do not want to tape off. For the actual painted edge along trim and walls, an angled brush and steady hand are still the most reliable approach.
Is It Better to Brush or Roll Paint on Trim?
Brushing is better than rolling for painting trim and baseboards. A brush gives you more control, especially near edges, corners, and detailed profiles. Rolling trim can work on very flat, wide surfaces, but on most standard baseboards and door casings, a brush delivers a smoother and more precise finish.
The best brush for trim is a 2 to 2.5-inch angled sash brush. The angled cut gives you easy access to corners and tight spaces. The bristles should be high quality, either synthetic nylon and polyester for latex paints, or natural bristle for oil-based paints. A good brush holds a consistent amount of paint and releases it evenly as you stroke, which minimizes brush marks in the final finish.
Rolling is better suited for walls and ceilings where you need to cover a large area fast. Some painters use a small 4-inch foam roller on the flat face of a wide baseboard to fill in the middle quickly, then follow up with a brush along the edges to feather out any texture. This combination speeds up the work on wide baseboard profiles without sacrificing edge quality.
For semi-gloss trim paint, which is the standard finish recommended for baseboards and door trim, brush marks can be more visible than on flat wall paint. Using long, smooth strokes and keeping a wet edge as you move down the board helps reduce visible marks in the dry finish. Two coats, with a light sanding between coats using 220-grit sandpaper, gives you the cleanest result.
What Is the General Rule for Painting Trim Work?
The general rule for painting trim work is to paint the trim first, then paint the walls. This order is the opposite of what many beginners assume, but it makes the job much easier. When you paint trim first, you can be slightly loose near the wall edges because you will cover those areas when you cut in the wall paint later. Working this way removes the pressure of being perfect on both surfaces at the same time.
Professionals typically follow this sequence: prime bare or repaired areas, paint trim and baseboards in full, let the trim dry completely, then paint the walls by cutting in carefully along the dried trim edge. Dried trim paint is easy to cut against because the edge is firm and defined. You can use the tip of your angled brush to guide a sharp line right along the trim without fear of pulling up wet paint.
Many homeowners in Red Bank and Gilbert find that following this simple order makes the whole painting project feel less stressful. It turns two difficult tasks into one easy workflow where each step sets up the next one.
When walls need patching before paint, drywall repair and painting done before any trim or wall color goes on gives you the smoothest possible surface to work from. Starting with good prep always leads to a better final result.
Why Don’t Painters Use Tape?
Painters do not use tape because it slows the job down, it can peel paint off walls when removed, it bleeds if not sealed properly, and a skilled freehand cut-in line looks better than a taped one. Professional painters spend years developing steady hands and the muscle memory to cut a clean line on demand. Tape, for them, is more of an occasional safety net than a standard practice.
There are real drawbacks to relying on painter’s tape. Applying it precisely to an entire room takes an hour or more before a single drop of paint is used. Paint still bleeds under tape if the wall surface is textured or slightly uneven, which is the case in most older homes. And pulling tape off too late, after the paint has fully hardened, can chip and lift the existing wall finish, leaving you with more repair work than if you had skipped it entirely.
According to professional painting forums and contractor discussions, most experienced painters either go completely freehand or use tape only as minimal protection in very tight spots, like spraying near cabinets or working around high-gloss finishes where even the smallest overspray would be hard to correct. For standard brush-applied trim work, the consensus among professionals is that a good brush and a steady hand beats tape every time.
Interior painting is a skill that improves with every room you paint. Homeowners who want a truly professional result often turn to residential painting professionals who can deliver tight, clean edges on every surface without the delays and headaches of masking an entire room.
What Can Be a Substitute for Tape?
The best substitutes for tape when painting trim are a wide drywall scraper used as a moving shield, a flexible paint edger tool, cardstock or an index card slid under the baseboard along carpet, and most effectively, a high-quality angled sash brush combined with a practiced cutting-in technique.
A paint edger tool is a plastic device with a thin metal or rubber guide that you press against the surface you want to protect while applying paint to the adjacent surface. It works similarly to the drywall scraper method but is designed specifically for painting. The limitation of edger tools is that they require frequent cleaning to avoid smearing paint from one surface to another.
Cardstock is particularly useful along carpet edges. You slide a rigid piece of cardstock between the baseboard and the carpet pile, paint the base of the trim, then pull the cardstock out and move it along the wall as you work. It costs almost nothing and works better than tape in this specific situation because carpet fibers tend to pull away from tape during removal, which can leave a fuzzy, paint-stained mess.
How to Paint Around Trim Without Taping?
To paint around trim without taping, use a sharp angled brush loaded with a moderate amount of paint, and cut in by making the first stroke slightly away from the trim edge to use up the heaviest paint load on the brush. Then work your way back toward the trim with a lighter, more controlled stroke, guiding the bristle tips right up to the edge.
Here is the step-by-step process professional painters use when painting walls around trim without any tape at all:
First, dip your angled brush about halfway into the paint and wipe one side clean on the edge of the can. This gives you a loaded side and a nearly dry side, which helps you control where the paint lands. Place the brush about a half-inch away from the trim edge and make a stroke parallel to the trim, running the full length of the section. This uses up the heaviest paint load and prevents a drip from hitting the trim accidentally.
Second, go back to the beginning of that stroke with the brush still somewhat loaded, and this time guide the bristle tips right against the trim edge. Move slowly. You are not racing; you are steering. Keep your eyes focused a few inches ahead of where the brush is, not directly on the brush tip. This keeps your hand from oversteering and wandering off the line.
Third, reload the brush and repeat. Work in sections of 12 to 18 inches at a time so the paint stays wet and you can blend each section into the next before either one dries.
For baseboards specifically, some painters in Lexington find it easier to paint the baseboard last, after the walls are fully dry. A dry wall gives you a firm, clear line to work against, and any accidental touches are easy to spot and correct before the baseboard paint sets.
How Do You Get Straight Lines When Painting Without Tape?
You get straight lines when painting without tape by controlling your brush load, moving slowly, keeping your wrist steady, and using the tip of the bristles, not the belly of the brush, to guide the edge. The line follows the bristle tips, so angling the brush so the tips are closest to the edge gives you maximum control over where the paint lands.
Good lighting is as important as technique. A work light positioned at a low angle and aimed at the surface you are painting reveals drips, thick spots, and uneven lines that would be invisible under standard room lighting. Catching a wavy edge while the paint is still open lets you wipe it back and redo it in seconds.
Posture and body position also matter. Crouch or kneel so your eyes are at the level of the work, not looking down at it from above. Painting at eye level gives you a direct view of the edge and helps you keep the brush moving parallel to the trim rather than drifting away from it.
Do You Cut In Twice When Painting?
Yes, most professionals cut in twice when painting. The first cut-in coat covers the edge area with the base color. The second cut-in coat, applied after the walls have been rolled, blends the cut-in line seamlessly with the rolled texture so there are no visible lap marks or sheen differences between the brushed edge and the rolled field.
The reason cutting in once is not always enough is that brush-applied paint and roller-applied paint have slightly different textures and sheen levels as they dry. When light hits the wall at a low angle, you can sometimes see a halo where the cut-in edge meets the roller coverage. Cutting in a second time, after rolling, blends those two zones together and eliminates that line.
For trim and baseboards specifically, two full coats of paint are always recommended, with a very light sanding between coats using 220-grit sandpaper. This removes any dust nibs or brush marks and gives the second coat a smooth surface to bond to. The result is a finish that looks factory-applied rather than hand-painted.
How to Get Your Paint to Roll On Without Lines?
To get paint to roll on without lines, use a quality roller cover with the right nap thickness, keep a wet edge by rolling in overlapping strokes before any section dries, and finish each section with light back-strokes in one consistent direction. These final strokes, called tipping off, lay the wet paint fibers flat and eliminate roller lines from the dried surface.
Nap thickness matters a lot. A 3/8-inch nap roller is ideal for smooth and semi-smooth walls. A thicker nap leaves more texture, which can create visible roller marks in flat or eggshell finishes. For trim work where you use a small roller on the face of a wide baseboard, a small foam roller with a smooth cover gives you the cleanest result.
| Method | Best For | Skill Level | Edge Quality | Time Required |
|---|---|---|---|---|
| Freehand Angled Brush (Cut-In) | Trim, baseboards, wall edges | Intermediate to Pro | Excellent when practiced | Fast, no prep |
| Drywall Scraper Shield | Baseboard top edge against wall | Beginner-Friendly | Very Good | Fast, no prep |
| Painter’s Tape (Standard) | All surfaces | Beginner | Variable, bleeds on texture | Slow, heavy prep |
| Paint Edger Tool | Wall-to-ceiling, wall-to-trim | Beginner | Good on smooth surfaces | Moderate |
| Cardstock Carpet Shield | Baseboard bottom edge over carpet | Beginner-Friendly | Good | Fast, no prep |
Method comparisons based on professional painting contractor guidance from industry sources including PaintTalk.com Professional Painting Forum and Hyde Tools painting guides. Edge quality ratings reflect typical results on smooth interior surfaces.
What Is the Hardest Room to Paint?
The hardest room to paint is the bathroom, followed closely by a stairwell. Bathrooms present every challenge at once: tight quarters that make maneuvering a brush difficult, humidity that slows drying and can cause paint to run, multiple surfaces in close proximity including walls, ceiling, tile edges, vanity trim, and door casings, and often textured ceilings that require careful cut-in work.
Stairwells are a close second because of the height involved. Cutting in a clean line where the wall meets the ceiling or the handrail trim when you are balanced on a ladder over a two-story drop takes skill and confidence. Many homeowners are comfortable painting a bedroom but call in professionals for the stairwell.
In older homes throughout Lexington, SC, bathrooms often have additional complications. Surfaces that were never fully sanded between previous paint jobs have built-up ridges and seams that make cutting a straight edge harder. Moisture from years of hot showers can cause the existing paint to have soft spots or delamination near the ceiling line. Proper prep, including sanding and priming, is essential before any new trim color goes on.
The key to making any difficult room easier is slowing down in the cut-in phase and investing in surface prep. Rooms that feel impossible to paint cleanly usually have one common problem: someone skipped the prep and jumped straight to the color coat.
When wall damage needs attention before painting begins, sheetrock installation and repair can smooth out holes, cracks, and damaged sections so the final paint coat bonds evenly and looks flawless from edge to edge.
What Is the New Trend for Baseboards?
The new trend for baseboards is taller, bolder trim with a flat or minimally profiled face, often painted in a contrasting color rather than the standard white. Many homeowners and designers in 2024 and 2025 are moving away from the traditional 3-inch builder-grade white baseboard and choosing profiles in the 5 to 7-inch range painted in warm cream, soft black, or the same color as the walls for a seamless, modern look.
Painting baseboards the same color as the walls, a technique called color-drenching or tonal painting, creates a smooth, flowing look that makes rooms feel larger and more cohesive. This approach eliminates the visual interruption that a contrasting white baseboard creates and has become especially popular in high-end homes and design publications as of 2025.
Semi-gloss and high-gloss finishes on trim remain the standard because the sheen adds durability and allows easy wiping. High-traffic areas like hallways and living rooms in Lexington homes near Lake Murray see a lot of foot traffic, scuffs, and dirt near the baseboard zone, so a wipeable finish is practical as well as attractive.
Darker accent baseboards, particularly in deep navy, charcoal, or matte black, are also trending in contemporary interiors. These darker trims anchor a room visually and work especially well with light hardwood floors and neutral wall colors. The combination of a clean, freshly painted dark baseboard against light flooring gives a space a sharp, well-designed look that photographs beautifully and impresses buyers.
For homes throughout the Lexington and Gilbert areas, keeping trim paint fresh is one of the simplest ways to stay current with interior design trends without a major renovation. A color change on the trim alone can shift the entire feel of a room.
Homeowners who want to update the full look of their home inside and out often start with full house painting that covers every surface from trim to ceilings, giving the property a completely fresh and consistent appearance throughout.
What Are Common Baseboard Installation and Painting Mistakes?
The most common baseboard painting mistakes are skipping surface prep, using too much paint on the brush, not caulking gaps before painting, painting over dirty surfaces, and pulling painter’s tape at the wrong angle when it is used.
Skipping surface prep is the number one mistake in any painting project. Baseboards collect dust, grease from cleaning products, and scuff marks from shoes and vacuum cleaners. If you paint over a dirty surface, the paint will not bond properly and will begin to chip or peel much sooner than it should. Wiping the baseboard down with a damp cloth and a mild cleaner, then allowing it to dry fully before painting, takes less than five minutes and makes a significant difference in how long the final coat lasts.
Not caulking is another major mistake. The gap between the top of the baseboard and the wall, and sometimes the gap at the floor, collects dust and makes any paint edge look uneven. Applying a thin bead of paintable latex caulk to that seam before painting seals it shut, creates a smooth transition, and gives the final painted edge a factory-fresh look. Caulk the seams, let them dry, then paint over them. That small extra step is what separates amateur results from professional ones.
Using too much paint on the brush causes drips on the face of the baseboard and runs at the bottom edge near the floor. Always tap or drag excess paint off the brush before applying it to the surface. Less paint, more passes, is always the better approach on trim work.
For homes with older walls and trim throughout the Red Bank and Gilbert areas, surface irregularities and old caulk seams often need more than just a fresh coat of paint to correct. In those cases, addressing the underlying wall condition first leads to a significantly better finished result.
What Happens If I Don’t Use Drywall Tape?
If you do not use drywall tape on joints and seams in your drywall, cracks will appear along those seams over time as the house settles and the drywall moves slightly with temperature and humidity changes. This is a structural repair concern, not a painting concern. Drywall tape is different from painter’s tape; it is the mesh or paper tape embedded in joint compound to hold drywall seams together and prevent cracking.
In the context of painting, skipping drywall tape on seams that were recently repaired means the joint compound has no reinforcement. Within months, cracks will reappear right through the paint, and the surface will need to be repaired again. Any drywall work around doorways, along baseboards, or at wall patches should always include proper taping and feathering of joint compound before any primer or paint is applied.
Homes in Lexington that have experienced any water damage, ceiling leaks, or prior wall patching should have those areas fully inspected before painting over them. Paint alone will not hide a bad repair for long.
Porch surfaces and exterior trim around doorways face even more stress from moisture and seasonal expansion. Keeping those surfaces caulked, primed, and freshly painted protects the wood underneath and prevents costly repairs down the road. Porch painting done with proper prep and the right exterior-grade products keeps those transition areas looking clean and staying protected through the hot, humid South Carolina summers.
When painting a full room or preparing a home for sale, interior trim, wall paint, and ceiling work all done at the same time by one crew stays on a single schedule and keeps the finished look uniform. Painting trim and baseboards as part of a full interior refresh rather than as a standalone patch job gives you the most complete and consistent result.
Frequently Asked Questions
Can you paint trim without taping in Lexington, SC homes?
Yes, you can paint trim without taping in Lexington, SC homes, and professional painters in the area do it on nearly every job. Most homes in the Lexington area have standard smooth drywall walls, which are easy to cut against using an angled brush and a steady hand. The freehand method saves hours of prep time per room and produces a cleaner edge than tape on most interior surfaces. For textured ceilings or rough plaster walls found in some older Lexington neighborhoods, a drywall scraper shield used as a moving barrier along the baseboard top edge works especially well.
What paint finish should I use for trim and baseboards?
Semi-gloss is the best paint finish for trim and baseboards. Semi-gloss is durable, holds up to frequent cleaning, resists moisture, and provides a subtle sheen that makes trim edges look crisp and defined. High-gloss is also a good choice for baseboards in high-traffic areas because it is even more washable, though it does show surface imperfections more clearly. Flat and eggshell finishes are typically used on walls but are not recommended for trim because they scuff and stain easily and are much harder to clean without damaging the paint surface.
How many coats of paint does trim need?
Trim needs two full coats of paint for a complete and durable finish. One coat of trim paint rarely provides even coverage, especially over previously painted surfaces where the old color shows through. Apply the first coat, let it dry fully according to the paint manufacturer’s recommended dry time, lightly sand the surface with 220-grit sandpaper to remove any dust nibs or brush marks, wipe away the sanding dust, and then apply the second coat. Two coats give you full, even coverage and a finish that holds up to daily contact much longer than a single coat would.
How long does it take to paint baseboards in an average Lexington home?
Painting baseboards in an average Lexington home typically takes between three and eight hours for a complete coat, depending on the size of the home, the amount of trim, and whether the surfaces need prep work before painting begins. A small two-bedroom home might have 200 to 250 linear feet of baseboard, while a larger four-bedroom home near Lake Murray could have 400 feet or more. Two coats with drying time in between usually means a full day of work. Professional painters move significantly faster because they use efficient techniques and cover larger sections with fewer passes.
Does painting trim add value to a home in Lexington, SC?
Yes, painting trim adds value to a home in Lexington, SC, as part of a broader interior update. According to data from Angi, interior painting delivers an average return on investment of 107%, meaning homeowners typically recoup their full investment and then some. According to an Opendoor report, 63% of real estate agents recommend painting the interior of a home before selling. Fresh, clean trim is a significant part of that visual impact because buyers notice scuffed or yellowed baseboards immediately. In a competitive Lexington real estate market, clean trim and fresh wall paint signal that a home has been well cared for, which builds buyer confidence and reduces negotiation leverage on price.
What type of brush is best for cutting in trim without tape?
The best brush for cutting in trim without tape is a 2 to 2.5-inch angled sash brush made with high-quality synthetic bristles for use with latex paint. The angled tip is what makes this brush work so well near edges; the cut bristles let you guide the very tips against the trim line while the thicker body of the brush holds enough paint to cover the area without requiring constant reloading. Cheap brushes with uneven or splayed bristles make freehand cutting in much harder and lead to ragged, inconsistent edges. Investing in a quality brush is the single best thing a DIY painter can do to improve their results on trim work.
Should I paint trim before or after walls in a Lexington home?
You should paint trim before walls in a Lexington home for the easiest and cleanest result. Painting trim first lets you be relaxed near the wall edges because those areas will be covered when you apply wall color later. Once the trim dries completely, cutting in the wall paint against the firm, dried trim edge is straightforward and requires very little tape or protection. This order, trim first then walls, is what most professional painters use on residential projects throughout Lexington, Red Bank, and Gilbert because it keeps the workflow moving fast and the edges sharp.
Final Thoughts
Painting trim and baseboards without tape is completely doable, and with the right tools and a little practice, it produces results that look better than most taped jobs. The core steps are always the same: clean and prep the surface, use a high-quality angled brush loaded correctly, cut in slowly with the bristle tips guiding the edge, apply two full coats with a light sanding between them, and caulk any gaps before you start. Follow the 7% rule when choosing baseboard proportions to keep your trim looking balanced and well-scaled to your room height, and choose semi-gloss paint for durability and easy cleaning.
Interior paint lasts an average of 7 to 10 years, according to industry data, so getting the job done right the first time pays off for years to come. According to a 2025 house painting statistics report, 80% of real estate agents believe that painting a home has a positive impact on its value. Fresh trim and baseboards are a big part of that impression. Whether you are refreshing a single room or preparing your whole home for the market, clean, crisp trim work makes every other part of the interior look sharper and more finished.
Ready for a professional finish on your trim, baseboards, and walls?
The team at Soda City Painting serves homeowners throughout Lexington, Red Bank, Gilbert, and the Lake Murray area. We handle all interior trim and painting work with tight cut-in lines, proper surface prep, and finishes that last. Call us at (803) 221-0771 or reach out online for a free estimate.
See the full range of what we offer on our professional interior painters in Lexington page and find out how a fresh paint job can completely transform the feel of your home.