To remove wallpaper and prep walls for paint, you need to strip both the face layer and the adhesive backing, repair any wall damage that the removal exposes, and apply primer before the first coat of paint goes on. Skipping any of these three steps will leave you with paint that peels, bubbles, or shows ugly seams under the new color. This guide covers every step of the process, from removing stubborn old wallpaper to getting walls smooth enough for a professional-looking paint job, with answers to every question homeowners across Lexington, SC are actually searching for.
How to Remove Wallpaper Prior to Painting
To remove wallpaper prior to painting, start by preparing the room, then test whether the paper is strippable, apply a removal solution, peel the paper in sections, scrub off the remaining adhesive, and let the walls dry completely before doing any repairs or priming. Rushing through any of these steps leads to wall damage and a poor paint finish.
Wallpaper has two components: the decorative face layer and an adhesive layer behind it. You must remove both to get a clean wall surface. According to Benjamin Moore, even the best primer and paint will not hide wallpaper seams, and applying paint directly over wallpaper can cause the paper to release from the wall during or after painting. The only reliable foundation for a lasting paint job is bare, smooth, primed drywall or plaster.
Homeowners across Lexington, SC, Red Bank, and the surrounding Lake Murray area frequently deal with this project when updating older homes that were wallpapered in the 1970s, 1980s, or 1990s. The process is the same regardless of how long the wallpaper has been on the walls, though older paper is often harder to remove.
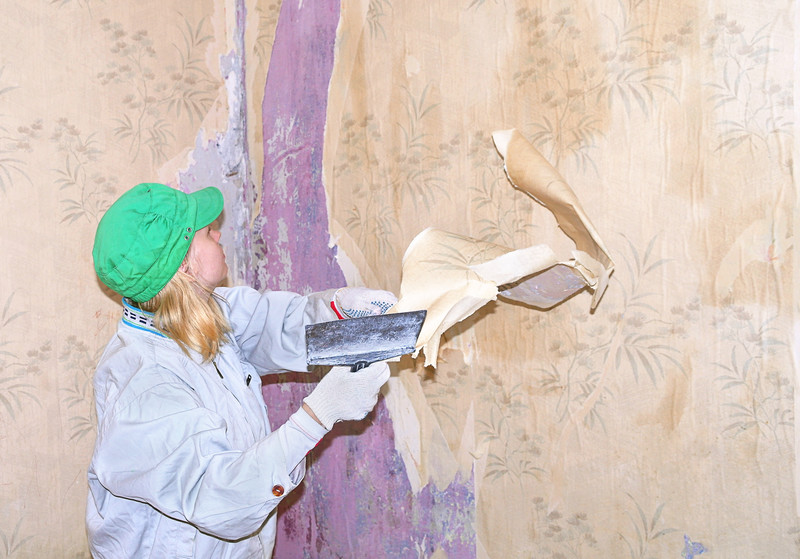
Step 1: Prep the Room Before You Start
Room preparation means removing all furniture you can carry out, covering everything else with plastic sheeting, laying drop cloths on the floor, removing outlet covers and switch plates, and taping plastic over any electrical outlets before you begin working with water. Turning off the electricity to the room at the breaker panel is the safest move.
Water is your main tool in wallpaper removal, and it gets everywhere. Floors, baseboards, and lower trim are all at risk of moisture damage if they are not protected. Use towels along the base of the walls to absorb runoff and prevent baseboards from warping or separating from the wall.
Step 2: Test the Wallpaper Before Removing It
To test the wallpaper before removing it, start at a corner or seam and try peeling a section dry. If the paper comes off cleanly in large strips without tearing the drywall paper underneath, you have strippable wallpaper, and removal will go quickly. If it tears, resists, or pulls the drywall face with it, you need a wetting solution and more patience.
Strippable wallpaper, the kind most commonly installed since the 1990s, is designed to come off in full sheets. Traditional porous wallpaper, which absorbs moisture easily, is moderately difficult to remove. Vinyl-coated wallpaper is the hardest because its non-porous surface resists wetting solutions and must be scored before any liquid can penetrate the adhesive.
Step 3: Score the Wallpaper If Needed
Score the wallpaper using a scoring tool if the face layer will not absorb your removal solution. A scoring tool rolls across the surface and creates small perforations that allow water or chemical remover to soak through to the adhesive behind. Use light pressure. Pressing too hard with the scoring tool will gouge the drywall beneath and create extra repair work later.
Vinyl-coated wallpaper always needs scoring. Traditional wallpaper often does not. When in doubt, score lightly on a small test area first. If the wetting solution soaks in without scoring, skip this step entirely. Unnecessary scoring on thinner wallpaper can damage the drywall surface and add hours of patching to your prep work.
What Is the Quickest Way to Remove Old Wallpaper?
The quickest way to remove old wallpaper is to peel the dry face layer first without wetting it, then wet the remaining adhesive backing and scrape it off. Removing the two layers separately is faster than trying to soak and peel both at once because the dry top layer often comes off in large, satisfying sheets, reducing the total surface you need to wet and scrape.
Work in manageable sections of about 4 feet by 4 feet. Apply your wetting solution, give it 5 to 10 minutes to penetrate, and begin peeling from a corner or seam. Do not let the solution dry on the wall before you start scraping, or you will need to re-wet the area. Keep the surface consistently damp and let the moisture do the work rather than forcing the scraper.
Does Dawn Dish Soap Remove Wallpaper?
Yes, Dawn dish soap does remove wallpaper when mixed with hot water. Dawn contains high concentrations of surfactants, which are molecules that reduce surface tension and allow water to penetrate through wallpaper adhesive more effectively than plain water alone. Many professional painters and experienced DIYers use a mixture of hot water and a few drops of Dawn in a pump sprayer as their go-to removal solution.
The recipe is simple. Fill a pump garden sprayer with hot water and add just a few drops of original Dawn dish soap. Spray the mixture onto the wallpaper, work in small sections, and give it 10 to 20 minutes to soak in before scraping. Reapply if the surface begins to dry. Professional painters on trade forums consistently recommend this method as an effective, low-cost, and low-toxicity alternative to commercial wallpaper stripping chemicals.
Other effective DIY solutions include equal parts white vinegar and hot water, or fabric softener diluted with water at a 1:1 ratio. Commercial products like DIF gel work well for vinyl-coated wallpaper that resists the soap-and-water method. A wallpaper steamer, which can be rented in the Columbia and Lexington, SC area, is the most effective tool for very old or multi-layer wallpaper that will not yield to liquid solutions.
How Do Professionals Strip Wallpaper?
Professionals strip wallpaper by first removing the dry face layer, then applying a wetting solution to the adhesive backing, working in controlled sections, and using a wide plastic or metal scraper to lift the wet backing cleanly off the wall. The goal is always to work fast enough that the solution does not dry between application and scraping.
Professional painters in the Lexington and Lake Murray area also use steamers on particularly stubborn jobs. A steamer penetrates adhesive without soaking the drywall with as much liquid as a spray solution, which reduces the risk of water damage behind the wall surface. For very old wheat-paste adhesive, which dries into something closer to cement than modern wallpaper glue, the professional approach is often to scrape what will come off, prime the residue firmly in place, and apply a skim coat over the entire wall rather than fighting every last bit of glue off the surface.
After removing all paper, professionals wash the walls with warm water and a mild cleaning solution to remove any remaining adhesive residue. Any glue left on the surface will interfere with paint adhesion and cause streaks or bubbling in the finished paint job. This cleaning step is not optional. According to Sherwin-Williams, painting over wallpaper glue causes adhesion issues and an uneven, unprofessional finish.
What Not to Do When Removing Wallpaper
The things you should not do when removing wallpaper are: use too much water on drywall walls, skip scoring on vinyl-coated paper, use a sharp metal scraper with heavy pressure, apply a wetting solution and immediately scrape, paint over remaining glue residue, and skip priming after the walls are clean. Every one of these mistakes will either damage the wall or ruin the paint job.
Drywall is softer than plaster and soaks up water quickly. Oversaturating drywall causes the paper face of the drywall itself to bubble, tear, and delaminate from the gypsum core beneath. Once that happens, the drywall face must be repaired or replaced before painting can proceed. In older Lexington homes with plaster walls, excessive moisture can cause plaster to soften and crumble. Apply wetting solutions in small sections and work quickly to avoid leaving walls saturated for too long.
Never use a metal scraper with downward gouging pressure. Hold the scraper at a shallow angle and slide it along the surface rather than digging in. Gouges in drywall require joint compound repairs that add significant time to the project. Many DIYers end up with walls that need as much patching as a major renovation simply because they rushed the scraping step.
How Do I Prep a Wall for Painting After Removing Wallpaper?
To prep a wall for painting after removing wallpaper, complete these steps in order: clean off all adhesive residue, repair any wall damage with joint compound, sand smooth, apply a quality primer, and let the primer dry completely before painting. Skipping or combining any of these steps produces a visible, unsatisfactory result.
Step 1: Clean the Walls Thoroughly
After all wallpaper is stripped, wash the walls with warm water and a mild detergent using a sponge or soft cloth. This removes adhesive residue, dust from scraping, and any paper fibers still stuck to the surface. Let the walls dry completely, which typically takes 24 hours in normal conditions. In humid South Carolina weather, allow extra drying time before moving to the next step.
Step 2: Inspect and Repair the Wall Surface
Wallpaper removal almost always leaves behind some damage. Look for gouges from scraping, areas where the drywall paper face has torn away, nail holes from old wall hangings, and uneven patches where adhesive built up over time. Fill all holes and gouges with a lightweight joint compound or spackling. For torn drywall paper, prime those areas first with an oil-based primer before applying joint compound, because joint compound will not bond correctly to bare drywall backing paper without it.
Step 3: Sand Smooth
Once joint compound repairs are dry, sand them smooth with medium-grit sandpaper first, then finish with fine-grit sandpaper for a seamless surface. Sand the entire wall lightly with fine-grit paper to remove any remaining adhesive ridges and create a consistent texture. Wipe down the walls with a barely damp cloth to remove sanding dust before priming.
Step 4: Apply a Skim Coat If Needed
If the walls are heavily pitted, textured from adhesive residue, or have widespread damage from wallpaper removal, a skim coat is the right next step. A skim coat is a thin layer of diluted joint compound spread across the entire wall surface to create a smooth, even base. According to HomeGuide, professional skim coating costs between $1.00 and $1.30 per square foot for walls. For a standard 12-by-12-foot room, this typically runs between $580 and $800 including labor and materials. For walls with extensive damage in Lexington or Gilbert area homes, a proper sheetrock repair may be the better long-term solution before any paint is applied.
Step 5: Prime Before You Paint
Priming after wallpaper removal is not optional. It is required. An oil-based or high-adhesion primer seals the wall, locks in any remaining adhesive residue, prevents staining, and gives the topcoat paint a uniform base to bond to. Sherwin-Williams, Benjamin Moore, and Behr all recommend an oil-based primer for walls that have been wallpapered, because it seals the porous surface and prevents old adhesive from bleeding through the paint.
Apply primer evenly with a roller for the open wall areas and a brush for edges and corners. Let it dry completely, following the manufacturer’s dry time instructions. In the high-humidity climate of South Carolina, this step is especially important for preventing paint adhesion problems down the road. Proper drywall repair and painting always starts with primer, and this project is no different.
What Is the Best Primer for Walls After Wallpaper Removal?
The best primer for walls after wallpaper removal is an oil-based primer or a high-adhesion shellac-based primer. Oil-based primers seal the wall’s porous surface, lock in adhesive residue so it does not bleed through the topcoat, and create a firm base for paint to bond to. Water-based primers work in many situations but are not the best choice for previously wallpapered walls because they can reactivate any remaining water-soluble adhesive and cause it to lift.
Popular professional choices include INSL-X Prime Lock Plus, Zinsser BIN Shellac-Based Primer, and Kilz Original Oil-Based Primer. These products are widely used by professional painting crews in the Columbia and Lexington, SC area. Apply at least one full coat, and in rooms with heavy adhesive residue or widespread drywall damage, two coats of primer are a better choice before painting begins.
Do Professional Painters Wash Walls Before Painting?
Yes, professional painters wash walls before painting, especially after wallpaper removal. Washing removes adhesive residue, sanding dust, grease, and any contaminants that would prevent paint from bonding properly to the surface. A clean wall is the foundation of a paint job that lasts. Painting over a dirty or greasy wall is one of the most common reasons paint peels or fails within the first year.
After washing, allow walls to dry completely. According to Sherwin-Williams, you should generally wait at least 24 hours after washing before applying primer in normal conditions. In humid weather like what Lexington and the Lake Murray area experiences in summer, allow additional drying time. Applying primer or paint over a damp wall traps moisture, which causes bubbling and peeling over time.
Is It Worth Removing Wallpaper Before Painting?
Yes, it is absolutely worth removing wallpaper before painting. Paint applied directly over wallpaper will not hide the seams, and the moisture from the paint can cause the old wallpaper to release from the wall during or after the job. Even premium paint cannot fix the visual problems caused by painting over wallpaper. The only exception is when the wallpaper is in perfect condition with no lifted edges, and the project is very short-term. For any permanent paint job, full removal is the right choice.
Painting over wallpaper also locks you in. Any future removal of the paper becomes much harder once paint has been applied over it, because the paint seals the paper to the wall and prevents wetting solutions from penetrating. Homeowners in the Red Bank and Chapin areas who paint over wallpaper and then try to remove it later often end up with far more wall damage than if they had removed the wallpaper before painting in the first place.
The extra work of wallpaper removal is worth every hour. The paint result is cleaner, smoother, and longer-lasting. This is the approach every professional painter takes on interior painting jobs in the Lexington area.
Do Professional Painters Remove Wallpaper?
Yes, many professional painters remove wallpaper as part of an interior painting project. Wallpaper removal is closely connected to the prep work that happens before any paint goes on a wall. Professional painters who handle full interior projects often include removal, wall repair, priming, and painting as a single scope of work. This saves the homeowner from coordinating multiple contractors and keeps the schedule on track.
Hiring a professional for wallpaper removal is especially worthwhile in homes with multiple wallpapered rooms, vinyl-coated paper that resists DIY methods, older plaster walls that require careful handling, or situations where the drywall beneath the wallpaper was never primed before the paper was hung. When drywall was not primed before wallpapering, which was common in homes built before the 1990s, removal tears the drywall face easily and requires professional-level repairs to make the wall paintable again.
According to HomeGuide, professional wallpaper removal costs between $0.80 and $3.00 per square foot for standard methods, with higher rates for vinyl-coated paper or rooms with difficult access. For a complete removal-and-paint project, the combined scope of house painting services handles both stages in one coordinated job.
How to Paint a Wall That Has Been Wallpapered
To paint a wall that has been wallpapered, fully remove all paper and adhesive, repair and sand the wall surface, prime with an oil-based primer, and then apply two coats of interior paint using a roller for the field and a brush for edges. The sequence is the same as any interior painting project, but the prep stage is more involved because of the adhesive and wall damage left behind by the wallpaper removal.
After priming, let the wall dry and inspect it under a raking light by holding a work light at a very low angle to the wall surface. This reveals any remaining imperfections, ridges, or uneven areas that will show through paint. Fill and sand any spots you find, apply a second coat of primer over those spots, and then proceed to painting.
Use a quality flat or matte interior paint for most rooms after wallpaper removal. Flat and matte finishes hide surface imperfections better than eggshell or satin. Rooms with repaired walls benefit from the forgiving qualities of a flat sheen, especially in larger open rooms where light strikes the wall at different angles throughout the day. Many families across Lexington, SC and Lake Murray choose flat paint for living rooms and dining rooms after wallpaper removal exactly because of how well it hides the evidence of a previously wallpapered wall. For the best results on any residential painting project, a flat sheen on repaired walls is the professional standard.
What Are Common Mistakes in Wallpaper Removal?
Common mistakes in wallpaper removal are: using too much water, scoring too aggressively, not allowing the wetting solution enough soak time, scraping before the adhesive is soft, skipping the wall-cleaning step, and painting without primer. Each of these errors creates problems that multiply later in the process.
One of the most common and costly mistakes is applying paint directly over remaining adhesive residue. Any glue left on the wall will cause the new paint to streak, bubble, or peel. The residue also soaks up paint unevenly, which creates dull and shiny patches in the finished surface. Scrubbing and rinsing the walls after removal takes extra time but prevents paint failure that requires the entire job to be redone.
Another frequent mistake is skipping repairs after removal and going straight to primer. Primer highlights imperfections rather than hiding them. Once primer is on a rough or pitted wall, every flaw becomes more visible under direct light. Always repair first, prime second, paint third. Residents in Forest Acres and Shandon who tackle this project themselves often call a professional at this stage when they realize the wall surface is rougher than expected after removal.
Is Wallpaper Outdated or Coming Back?
Wallpaper is coming back strongly, not fading out. Design experts and major wallpaper brands report that wallpaper has been growing in popularity since 2022 and shows no signs of slowing down. According to reporting by Homes and Gardens, 2024 proved to be a landmark year for bold and patterned wallpaper, and this momentum is continuing into 2025 and 2026. Leading design publications describe wallpaper as the “star of the show” in modern interiors rather than a background element.
Current wallpaper trends favor scenic murals, vintage-inspired heritage patterns like chinoiserie and toile, large-scale botanical prints, and maximalist all-over designs that wrap every wall of a room. Color-drenching, which uses wallpaper to coat walls, ceiling, and even trim in the same bold pattern or color, is gaining ground in dining rooms, bedrooms, and powder rooms. Peel-and-stick wallpaper, which is far easier to remove than traditional paste-based paper, has made wallpaper more accessible to renters and homeowners who want flexibility.
The lesson here is practical. If you are removing old wallpaper to paint, the good news is that removing it cleanly and prepping the walls correctly leaves you with the option to wallpaper again in the future using modern, strippable versions that are much easier to work with. And if you choose to paint instead, a smooth, primed wall is the best canvas for any color you choose.
What Is the Downside to Peel and Stick Wallpaper?
The downside to peel and stick wallpaper is that it can be difficult to apply without bubbles and creases, it does not adhere well to textured walls, it can pull paint off the wall when removed if the surface was not properly prepared, and the adhesive weakens in humid rooms over time, causing edges to lift. Peel and stick wallpaper also has a narrower range of designs compared to traditional paste wallpaper.
In a humid climate like Lexington, SC and the broader Midlands of South Carolina, the adhesive in peel and stick wallpaper is particularly vulnerable to moisture. Bathrooms, kitchens, and any room without consistent climate control see higher rates of peel and stick failure. Traditional paste wallpaper, applied with proper sizing on a primed wall, holds better in high-humidity environments but requires more work to remove later.
If you are in a Lake Murray area home and are considering peel and stick wallpaper in a bathroom or kitchen, consult a professional first. The right surface preparation makes all the difference in how long peel and stick products actually stay on the wall.
Frequently Asked Questions
How Long Does Wallpaper Removal Take in a Lexington, SC Home?
Wallpaper removal in a Lexington, SC home typically takes 2 to 4 hours per room for a skilled DIYer working on a single-layer wallpapered room with strippable paper. Rooms with vinyl-coated paper, multiple layers, or drywall that was not primed before papering can take significantly longer. A professional crew works faster because of specialized tools and technique. Most professional painters budget about a full day for removal, wall repairs, and priming in a standard bedroom or living room before painting can begin.
How Much Does Wallpaper Removal Cost in the Lexington and Lake Murray Area?
Wallpaper removal costs between $0.80 and $3.00 per square foot for standard methods, according to HomeGuide. Vinyl-coated wallpaper and rooms with difficult access cost more. Post-removal wall repairs such as patching and skim coating add $100 to $500 for minor work, according to Angi. Because every home is different, the most accurate way to get a price for your Lexington or Lake Murray area home is to contact a local professional for an on-site estimate.
Do I Have to Prime After Removing Wallpaper in My Lexington Home?
Yes, you must prime after removing wallpaper in your Lexington home. An oil-based or high-adhesion primer seals remaining adhesive residue, stabilizes the wall surface, and gives your new paint a proper base to bond to. Painting without primer after wallpaper removal almost always leads to an uneven finish, paint that does not adhere correctly, or old adhesive bleeding through the new paint color. Primer is not a step you can skip and still get a professional result.
How Much Does It Cost to Skim Coat Walls After Wallpaper Removal?
A professional skim coat costs between $1.00 and $1.30 per square foot for walls, according to HomeGuide. For a standard 12-by-12-foot room, a skim coat typically runs between $580 and $800 including labor and materials. A skim coat is necessary when walls have widespread pitting, heavy adhesive texture, or significant drywall damage from the removal process. For homes in the Lexington, Red Bank, or Gilbert area with badly damaged walls, this is the step that makes the difference between a wall that looks repaired and a wall that looks like it was never wallpapered at all.
What Is the Best Wallpaper Removal Solution for Old Wallpaper in South Carolina Homes?
The best wallpaper removal solution for old wallpaper in South Carolina homes is hot water mixed with a few drops of Dawn dish soap in a pump sprayer. This mixture is low-cost, low-toxicity, and widely used by professional painters and experienced DIYers. For vinyl-coated wallpaper that resists water penetration, a commercial gel remover such as DIF works better after scoring. For very old wheat-paste adhesive common in homes built before the 1970s, a wallpaper steamer is the most effective tool and can be rented in the Columbia and Lexington, SC area.
Can I Paint Over Wallpaper Instead of Removing It?
You can paint over wallpaper in limited situations, but it is not recommended for permanent results. If the wallpaper has no lifted edges, is fully adhered to the wall, and the room is a short-term situation, painting over wallpaper with an oil-based primer and two coats of paint may hold temporarily. However, the seams will always show through the paint, and any future wallpaper removal becomes significantly harder once paint is applied over it. For a lasting, professional result in any Lexington, SC home, removing the wallpaper completely is always the better choice before painting begins.
What Happens If You Skip Priming After Wallpaper Removal?
If you skip priming after wallpaper removal, the new paint will absorb unevenly into the wall surface, causing streaky or patchy coverage. Any remaining adhesive residue can bleed through and create discolored spots in the finished paint. The paint may also peel or bubble over time because it has not bonded to a stable, sealed surface. Homeowners in the Chapin and Forest Acres area who skip primer after wallpaper removal often find themselves repainting the room within a year or two, spending more money than a proper primer coat would have cost up front.
Final Thoughts
Removing wallpaper and prepping walls for paint is a multi-step process that rewards patience. Done correctly, it leaves you with walls that look clean, feel smooth, and hold paint beautifully for years. The key steps are stripping both the face layer and the adhesive, cleaning the walls thoroughly, repairing all damage, priming with a quality oil-based product, and then painting. Cut any of those steps short and you will see it in the finished result. The good news is that none of these steps are complicated. They just take time and the right products.
When the job is more than you want to take on yourself, or when the walls under the wallpaper are in rough shape, calling a professional saves you hours of frustrating work and guarantees a result you will actually be happy with. The team at Soda City Painting serves homeowners across Lexington, Red Bank, Gilbert, Chapin, and the Lake Murray area with professional interior painting services that cover everything from wallpaper removal and wall repairs to priming and final paint application. Contact Soda City Painting today for a free estimate and let the professionals handle every step so your walls come out looking exactly the way you want them.