To touch up paint without showing marks, you need to match both the color and the sheen of the original paint, clean and lightly prepare the area, and use the feathering technique to blend the new paint into the surrounding wall. A touch-up that uses the right product but the wrong application method will always be visible. According to Benjamin Moore, seamless touch-ups require more than matching color. They involve sheen alignment, surface preparation, and the correct blending technique. This guide walks through every step, explains why touch-ups go wrong, and answers the most common questions homeowners in Lexington, SC ask before picking up a brush.
How to Touch Up Paint Without It Being Noticeable
To touch up paint without it being noticeable, you must match the original color, match the original sheen, use the same application tool that was used for the original paint job, clean the area first, and blend outward using the feathering technique. Every single one of those five steps has to be right. Miss even one and the patch will be visible.
Paint touch-ups sound easy. They are not. According to Prep Smart Painting, even when homeowners use the exact same paint from the original can, the results can still look uneven. The reason is not just color. It is how paint changes over time, how it interacts with light at different sheens, and the texture difference between a fresh patch and an aged wall. Knowing why touch-ups fail is the first step to making sure yours does not.
Why Does Touch-Up Paint Look Different From the Original?
Touch-up paint looks different from the original because paint ages and fades over time, new paint has a slightly different sheen than old paint, and the fresh coat absorbs into the wall differently than the paint surrounding it. Crown Paints explains that exposure to light causes subtle fading, while everyday dust and cooking residue create an almost invisible film on aged walls. When fresh paint goes over that aged surface, the difference between new and old becomes visible.
There are four main reasons a touch-up stands out. First, the paint on the wall has faded since it was first applied, so new paint from the same can looks brighter and richer by comparison. Second, sheen builds with multiple coats. A spot with only one coat of touch-up paint reflects light differently than the two-coat wall surrounding it. Third, if the application tool is different, the surface texture is different. Using a brush on a rolled wall leaves visible strokes that catch light at an angle. Fourth, patched areas are more porous than the existing wall, which causes them to absorb paint unevenly, creating a dull halo effect called flashing.
What Mistakes to Avoid When Touching Up Paint
The mistakes to avoid when touching up paint are using the wrong sheen, skipping the cleaning step, using too much paint in one thick coat, using a brush on a wall that was originally rolled, applying paint without feathering the edges, and judging the result before the paint has fully dried and cured.
According to ThePaintStore.com, overloading a brush or roller is one of the most frequent errors. Excessive paint causes drips, uneven application, and visible texture differences between the touched-up area and the surrounding wall. Professional painters recommend using the least amount of paint necessary and gradually building up with thin layers rather than applying one heavy coat. Homeowners in the Lexington area who make these mistakes often end up having to repaint an entire wall when a careful touch-up would have handled the job.
What If Touch-Up Paint Looks Different Once Dry?
If touch-up paint looks different once dry, the most likely causes are a sheen mismatch, inadequate feathering, insufficient primer on a patched area, or paint that is too old to match the aged wall color. Allow the paint to dry fully, at least 24 to 48 hours, before concluding it cannot blend. According to Dunn-Edwards Paints, paint often darkens or softens slightly as it cures, and a patch that looks mismatched at first may even out once the paint fully settles.
If the touch-up is still visible after full drying, lightly sand the edges of the patch and reapply with a thinner coat, feathering farther outward than before. If sheen is the problem, a mini roller applied over a slightly wider area will help equalize the reflectivity. When neither of those approaches works, repainting the entire wall from corner to corner is the cleanest solution.
How to Paint Over Marks Without Making It Obvious
To paint over marks without making it obvious, clean the mark first with a damp cloth and mild soap, try to remove it without painting if possible, and only proceed to paint if cleaning does not work. If you do need to paint, lightly prepare the area, prime if needed, and use the feathering technique with the correct sheen to blend into the surrounding surface.
Benjamin Moore advises that if you have a scuff or mark on a painted wall, the first step should always be trying to clean it with a rag and soapy water before reaching for the paint. Many marks on painted walls come off with a light clean. Paint should be the last resort for surface marks, not the first. Trying to cover a dirty or greasy mark with paint without cleaning it first will cause the paint to peel right over the mark.
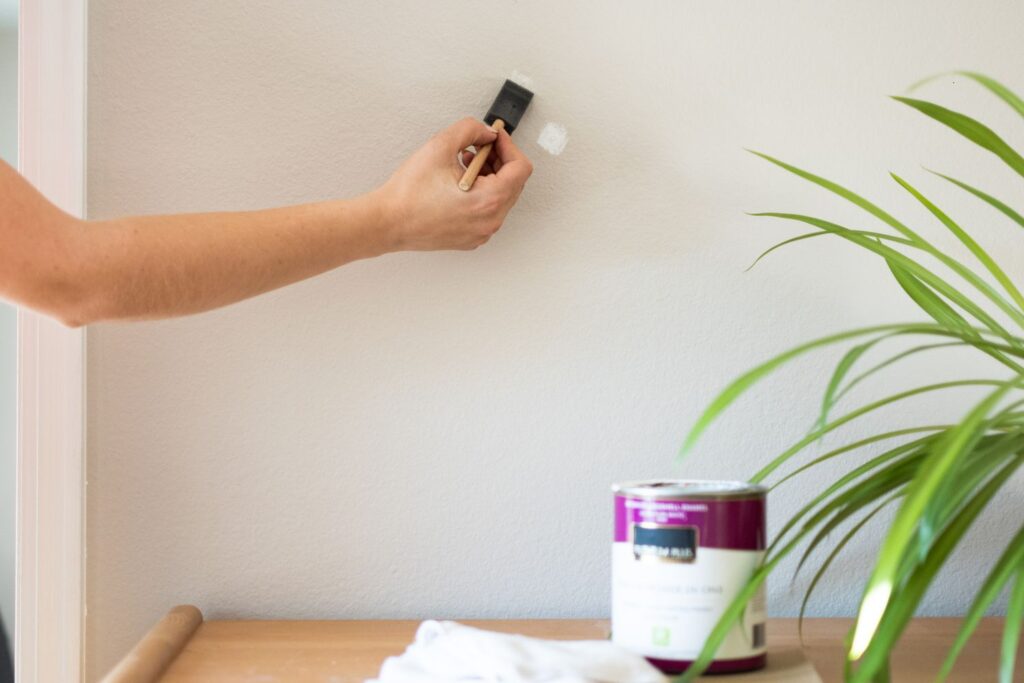
How to Make Touch-Up Paint Invisible: The Feathering Technique
To make touch-up paint invisible, use the feathering technique: apply a small amount of paint to the center of the repair area with your chosen tool, then, while the paint is still wet, gradually extend outward with lighter and lighter pressure until the paint film tapers to almost nothing at the edges. This creates a soft gradient between new and old paint rather than a hard-edged patch that catches the light.
Here is the full process from start to finish.
Step 1: Clean the Area First
Before anything else, clean the area you plan to touch up. Wipe it down with a slightly damp sponge and a small amount of mild dish soap. Rinse with a clean, barely damp cloth and allow it to dry completely. According to Diamond Vogel, dirt and oils on the surface cause poor adhesion and make the sheen of the touch-up paint look different from the surrounding wall.
Do not use paper towels or dry rags for this step. Diamond Vogel warns that abrasive tools like paper towels can burnish the painted surface, removing some of the pigment and making the area even harder to touch up. A soft microfiber cloth or a damp sponge is the right tool.
Step 2: Repair Any Damage Before Painting
If the mark has created a dent, hole, or crack, fill it with spackling compound or an appropriate wall filler. Apply it with a putty knife, smooth it flush with the wall, and let it dry completely. Then sand it smooth with 220-grit sandpaper. Wipe away the dust with a barely damp cloth and let it dry again before applying anything else.
Patched areas are more porous than the rest of the wall, which means they absorb paint faster and can look duller than the surrounding surface. A light coat of primer over the patch before applying your touch-up paint prevents this. According to Family Handyman, priming repaired areas ensures the fresh coat absorbs evenly and avoids flashing.
Step 3: Match the Color and the Sheen Exactly
Matching the color alone is not enough. You must also match the sheen. According to Benjamin Moore, flat or matte finishes touch up the most easily because they reflect little light, making any slight differences less visible. The glossier the finish, the more obvious a mismatch in sheen becomes.
If you have leftover paint from the original job, use it. If not, take a chip of wall paint to a paint store for color matching, and specify the exact sheen. According to True Value Hardware, even a very slight difference in sheen levels makes a touch-up stand out. Flat finishes are the most forgiving. Semi-gloss and gloss finishes are the most difficult to touch up seamlessly and may require repainting the full wall for the best result.
One more important factor: stir the leftover paint thoroughly before using it. According to Crown Paints, paint components settle over time, and using the top layer without fully stirring the can produces a slightly different color and sheen from what is on the wall. Stir it well from the bottom up, not just a quick swirl at the top.
Pro Tip: According to Diamond Vogel, store leftover paint upside down with the lid sealed tightly in a cool, dry, temperature-controlled area. This limits the amount of air that reaches the paint and keeps it usable for future touch-ups much longer. Always label the can with the room name and the date it was painted.
Step 4: Use the Same Application Tool as the Original Paint Job
Using the same type of application tool used for the original paint job is one of the most overlooked steps in touch-up work. Rollers leave a subtle stipple texture. Brushes leave stroke marks. Sprayers leave a smooth, even film. Each reflects light differently. According to Homes and Gardens, you should never use a brush to touch up a wall that was originally rolled. The brush marks will be visible and will highlight the different textures even if the color and sheen are identical.
For most interior walls in Lexington and the surrounding SC area, a mini roller with the same nap size as the original application is the best tool for touch-ups. According to Just Add Paint, a 4-inch mini roller is the industry standard for touch-up work. It has a similar texture to a full-size paint roller and minimizes the difference in surface pattern between the repair and the surrounding wall.
Step 5: Apply the Feathering Technique
Load the brush or mini roller with a very small amount of paint. Less is more here. Start in the center of the repair and apply the paint there with the most pressure. Then, while the paint is still wet, gradually extend outward from that center point with lighter and lighter pressure, thinning the paint film toward the edges.
According to 260 Roofing, feathering blends new paint into old the same way you blend a gradient in a drawing. The center of the repair gets the most coverage. The outer edges get almost none. This creates a gradual, imperceptible transition between new and old paint. Without reloading your brush or roller, extend strokes slightly beyond the repair zone to help the transition disappear.
Apply two to three thin coats rather than one thick one. Let each coat dry fully before evaluating whether another is needed. A thick coat is the most common reason a touch-up creates a noticeable raised patch that reflects light differently from the wall around it.
Step 6: Check the Result in Different Lighting Conditions
After the paint dries, check it under both natural and artificial light and from multiple angles. A touch-up that looks invisible in daylight may catch the light differently at night under overhead fixtures. According to Hello Lovely Living, natural and artificial light can highlight differences in color and sheen, so inspecting the result from multiple lighting conditions is essential before calling the job done.
Give the paint a full 24 to 48 hours to dry and begin curing before making a final judgment. What looks slightly off when wet or freshly dry often blends better once the paint fully settles and hardens.
How to Stop Marks Showing Through Paint
To stop marks from showing through paint, clean the surface first to remove grease and dirt, use a stain-blocking primer over the mark before applying your finish coat, and apply at least two coats of paint over the primed area. Marks that bleed through paint are almost always caused by not priming before the finish coat.
Certain stains, including water damage, smoke, grease, marker, and crayon, require a dedicated stain-blocking primer such as Zinsser BIN or Kilz Original before any topcoat paint will cover them. Applying paint directly over these marks without primer gives the stain something to leach through, no matter how many coats of finish paint you use. According to Diamond Vogel, if a mark is still present after cleaning with mild detergent, a stain-blocking primer is required before touch-up paint will hold.
How Do I Get a Perfect Line Between My Wall and Ceiling?
To get a perfect line between your wall and ceiling, apply painter’s tape carefully, press the edge firmly to prevent bleed-through, use a steady angled sash brush with the right amount of paint loaded on the tip, and cut in slowly rather than quickly. The right tape placement and the right brush load matter more than how fast you move.
The most common reason a wall-to-ceiling line is not clean is that the tape was not pressed firmly enough. Any gap between the tape edge and the surface allows paint to bleed under. Run a putty knife or a credit card along the tape edge after applying it to press it down completely. For textured walls, which are common throughout Lexington, SC homes, use a tape product designed for textured surfaces to minimize bleed-through.
When cutting in without tape, load the angled brush lightly, fan the bristles slightly against the wall before the brush reaches the ceiling line, and move steadily. Professional painters who handle interior painting projects use a technique of barely touching the tip of the brush to the surface at the line, which gives far more control than pushing the bristles flat against the wall.
Is It Better to Touch Up with a Brush or Roller?
It is better to touch up with a mini roller for most interior walls, because rollers match the stipple texture of the original paint application on most painted surfaces. A brush is better only for small, precise spots under about one inch in diameter, for trim, or for walls that were originally brushed rather than rolled.
According to COAT Paints, for larger patches, a roller gets a smoother finish and matches the original texture far more naturally than a brush. For tiny marks and nail holes less than an inch across, a small foam brush is the right tool because it lets you dab paint precisely onto the spot without spreading it onto the surrounding wall.
The key rule is simple: match the tool to the original application. Rolled walls get touched up with a roller. Brushed surfaces get touched up with a brush. Never mix the two on the same surface.
How to Get Paint to Roll on Without Lines
To get paint to roll on without lines, keep a wet edge at all times by moving quickly across the wall and overlapping each roller pass by about 50 percent before the previous pass dries, load the roller evenly and avoid overloading it, and roll in long vertical strokes from floor to ceiling in a single pass rather than short back-and-forth strokes.
Roller lines, also called lap marks, happen when you roll over partially dried paint. Each time you go back over a section that has started to dry, the dried edge creates a ridge that catches light differently. The solution is to keep moving and maintain that wet edge. For touch-up work specifically, a mini roller with a fresh cover gives the most even application without leaving roller track marks.
For very smooth walls, a shorter nap roller cover of one-quarter inch gives the flattest result. For slightly textured walls, which are common in many homes throughout the Red Bank and Gilbert areas, a three-eighths-inch nap provides better coverage into the texture without creating too much stipple. According to ThePaintStore.com, matching the original roller nap size is one of the most important factors in achieving a seamless touch-up on textured surfaces.
How to Fix Paint Ghosting
To fix paint ghosting, clean the affected area thoroughly to remove the airborne particles causing the discoloration, apply a stain-blocking primer to seal the surface, and repaint with a quality finish in the correct sheen. Simply painting over ghosting without cleaning and priming first causes the same marks to reappear through the new coat.
Paint ghosting is a staining effect caused by airborne particles such as soot, oils, and dust settling on cold spots on the wall. According to CertaPro Painters, these cold spots usually line up with the structural framing inside walls, where insulation is uneven or airflow gets trapped. The result looks like gray lines or shadow marks that trace the studs or joists behind the drywall. It is most common near ceilings, above baseboards, and around HVAC vents.
Ghosting does not indicate mold or structural damage in most cases. It is a surface-level problem that requires the right prep to fix permanently. Painting over it without cleaning and priming first is wasted effort, as the particles responsible for the staining will bleed through any new topcoat that is not sealed first. Many homeowners in the Lexington, SC area encounter ghosting along ceiling lines and near exterior walls where temperature differences between inside and outside air create condensation patterns on the wall surface.
What Is the Hardest Color to Paint Over?
The hardest colors to paint over are deep reds, deep oranges, and saturated jewel tones. These pigments contain high concentrations of strong dyes that bleed through lighter topcoats and require multiple coats of paint, often with a stain-blocking primer in between, before the new color fully covers the old one.
Red is particularly difficult because the pigments used in red paint are chemically aggressive. A red wall painted over with white or beige will often show through for three or four coats before it fully disappears. Dark hunter green, royal blue, and navy have similar properties. For any touch-up or repaint over these colors, a tinted primer matched to the new color is the most reliable first step. It shortens the number of topcoats needed and prevents the old color from bleeding through the fresh finish.
True Value Hardware also notes that reducing paint slightly, by about 10 to 15 percent with a manufacturer-recommended reducer, can help touch-up paint blend more smoothly over difficult colors by allowing it to level and feather more easily at the edges.
What Are the Three Paint Colors That Will Never Go Out of Style?
The three paint colors that will never go out of style are warm white, soft gray, and classic navy blue. These three colors have remained consistently popular across decades of interior design trends because they are flexible, complement a wide range of furnishings and materials, and work in virtually any room at any price point.
According to design data from LUXE Interiors and industry experts, warm whites like Benjamin Moore’s Chantilly Lace and Sherwin-Williams Alabaster are among the most enduringly popular colors across the residential market. Soft gray remains a sophisticated neutral that pairs with nearly every decor style. Navy blue, according to Up Paint and multiple design publications, adds depth and richness without going in and out of fashion the way more trend-specific colors do.
Beyond those three, green and blue as color families are cited by Kylie M Interiors as the most consistently timeless paint color groups, because they appear in virtually every major trend cycle without ever feeling dated. Earthy neutrals, including warm beiges, soft taupes, and creamy whites, are also considered enduring staples that rarely need updating to feel current.
For homeowners planning a full repaint in the Lexington area who want to choose a color that will still feel fresh in 10 years, these are the safest bets. Choosing a timeless color also makes future touch-ups easier because the color on the wall will still be available at paint stores for years to come.
Professional residential painting teams can help match and select colors that photograph well and hold their value through multiple seasons of design trends.
What Is the Best Technique for Touch-Up Paint?
The best technique for touch-up paint is the feathering method combined with a mini roller, using a minimal amount of paint loaded on the tool and building up with two to three thin coats rather than one thick application. According to Diamond Vogel, the fundamental principle of a successful touch-up is limiting variables from the original application: same paint, same sheen, same application tool, same technique, applied at a similar temperature to the original paint job.
Here is the complete comparison of touch-up scenarios and the right technique for each:
| Situation | Best Tool | Key Technique | Most Common Mistake |
|---|---|---|---|
| Tiny nick or nail hole under 1 inch | Small foam brush | Dab paint, do not stroke | Using too much paint |
| Scuff or surface mark, 1–4 inches | Mini roller (matched nap) | Feather outward from center | Using a brush on rolled wall |
| Patched dent or spackled hole | Mini roller, then light brush | Prime first, two thin coats | Skipping primer over patch |
| Mark that bleeds through | Brush for stain-blocker primer | Stain-block first, then topcoat | Painting over without priming |
| Ceiling line or trim edge | Angled sash brush | Tape, press firmly, light brush load | Loose tape edge, too much paint |
| Ghosting near ceiling or baseboard | Roller after priming | Clean, stain-block prime, full repaint | Painting without cleaning first |
Sources: Benjamin Moore, Family Handyman, Diamond Vogel, True Value Hardware, CertaPro Painters, Crown Paints, ThePaintStore.com
When touch-ups are on a high-sheen surface or when the wall has aged significantly, the most reliable outcome is repainting the full wall from corner to corner. According to Just Add Paint, a single additional coat rolled corner to corner normally resolves touch-up matching issues on walls with sheen. It removes the variable of trying to blend a small patch into an aged surface and gives a uniformly fresh result with far less effort than fighting an invisible touch-up battle.
Homeowners who want a truly seamless result on walls with semi-gloss or higher sheens, or on walls that have significant sun fading, should explore the drywall repair and painting services that handle both the surface preparation and the finish in a single professional process.
Frequently Asked Questions
How do I touch up paint without it being noticeable in a Lexington, SC home?
To touch up paint without it being noticeable in a Lexington, SC home, match both the color and the sheen of your original paint, use the same type of tool that applied the original coat, clean the area first, and use the feathering technique to blend the new paint outward from the center of the repair. The South Carolina climate means walls in the Lexington area can experience humidity-related subtle color shifts over time, so if your wall has been painted for more than two years, getting the touch-up paint color-matched at a local paint store rather than using an old can is often a more accurate match.
How to make touch-up paint invisible on flat or matte walls?
To make touch-up paint invisible on flat or matte walls, clean the spot first, feather the paint outward with a mini roller, and apply two thin coats rather than one thick one. Flat and matte finishes are the easiest surfaces to touch up because they reflect very little light, which hides small differences in texture and film thickness. According to Benjamin Moore, flat or matte finishes touch up better than any other sheen, which is one reason interior designers often recommend flat paint for walls in high-traffic areas that will need periodic touching up.
What if touch-up paint looks different after it dries in high-humidity areas like the Lake Murray waterfront?
If touch-up paint looks different after drying in high-humidity areas like the Lake Murray waterfront, give it a full 48 hours to cure before evaluating the result. High ambient humidity slows the curing process, which can make paint appear slightly different in color and sheen until it fully sets. If the match still looks off after 48 hours, the most likely cause is a sheen mismatch. In humid climates, using a quality interior paint with a mold and mildew-resistant formula also helps the finish maintain consistent color over time, reducing how quickly it fades compared to the touch-up paint.
How do I stop marks from showing through paint on interior walls in Red Bank or Gilbert?
To stop marks from showing through paint on interior walls in Red Bank or Gilbert, apply a stain-blocking primer directly over the mark before any topcoat. Marks from water stains, grease, smoke, marker, or crayon contain pigments or oils that will bleed through finish paint no matter how many coats you apply without a stain-blocking barrier. Products like Zinsser BIN or Kilz Original are widely available and reliably seal most interior stains before finish painting.
When should you repaint the whole wall instead of just touching up?
You should repaint the whole wall instead of just touching up when the existing paint has faded significantly from sun exposure, when the wall has a semi-gloss or higher sheen that makes small patches visible, when multiple patches across the wall create an inconsistent look, or when the original paint color is no longer available for matching. According to True Value Hardware, in some cases painting one full wall from corner to corner is the better option because the naked eye cannot tell the difference between walls after the new paint has dried and aged uniformly.
Does Soda City Painting handle touch-up painting and wall repairs in Lexington, SC?
Yes, Soda City Painting handles interior painting and wall repair projects in Lexington, Red Bank, Gilbert, and the Lake Murray area. Their services cover everything from small touch-up blending to full-wall repaints and drywall patching. Their team uses premium products from Sherwin-Williams and Benjamin Moore, follows a thorough prep process, and backs all work with a satisfaction guarantee. Call (803) 221-0771 or contact them online for a free estimate.
Get Touch-Ups Done Right the First Time
A paint touch-up looks easy but has more moving parts than most homeowners expect. Matching color and sheen, choosing the right tool, feathering correctly, and knowing when a full wall repaint is the better answer all take experience. When a touch-up is done wrong, you often end up with something more visible than the original scuff.
The team at Soda City Painting serves homeowners throughout Lexington, Red Bank, Gilbert, and the Lake Murray area with professional interior painting, drywall repair, and surface prep that gets the result right the first time. Whether it is a single wall, a full repaint, or a drywall patch that needs professional blending, the team brings the tools, the products, and the experience to make it seamless. Call (803) 221-0771 today or reach out online to schedule your free estimate. For a full look at interior repair and painting options, visit the interior painting services page.