Bubbling paint on exterior walls is caused by moisture, heat, poor surface prep, or incompatible paint products that prevent the paint from bonding properly to the wall. The fix is to scrape away the damaged paint, address the root cause, sand the surface smooth, apply primer, and repaint. Skipping the root cause step means the bubbles will come right back. This guide covers every cause, every fix, and how to keep it from happening again on your home’s exterior.
Will Exterior Paint Bubbles Go Away on Their Own?
Exterior paint bubbles will not go away on their own in most cases. According to Sherwin-Williams, paint bubbles are one imperfection that does not disappear with time. If you ignore them, they will get larger or burst, leading to further peeling and cracking that costs more to fix later. The only exception is when fresh paint bubbles from rain exposure before it has fully cured. According to Benjamin Moore field implementation manager Mike Mundwiller, if rain hits before the paint dries, the bubbles may disappear once the sun comes out and the surface dries. Outside of that single scenario, bubbles must be repaired.
Homeowners across Lexington, SC deal with this problem regularly, especially after humid summers when moisture-related paint failure is common. The sooner the problem is caught and fixed, the less damage occurs to the wall underneath.
What Is the Difference Between Blistering and Bubbling Paint?
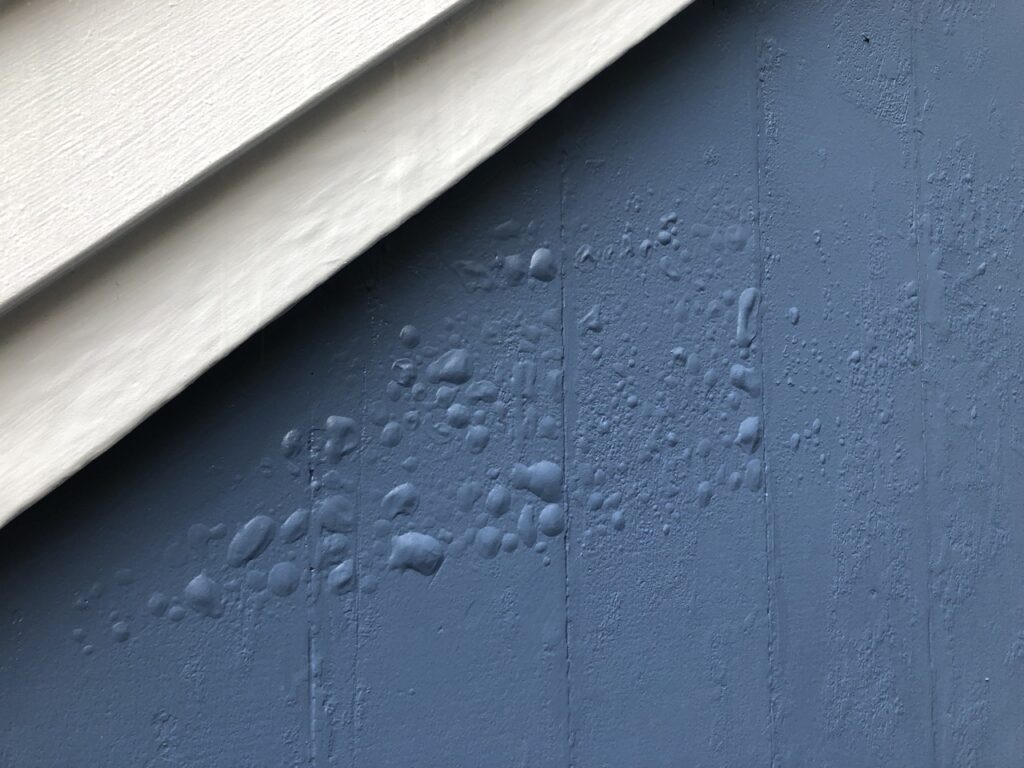
There is no difference between blistering and bubbling paint. According to Sherwin-Williams, paint bubbling and blistering are the same thing, and the terms can be used interchangeably. Both describe the same condition: the paint film has lost adhesion to the surface beneath it, forming raised pockets filled with air or moisture. The bubbles can range from tiny pinhead-sized dots to larger patches that cover several square inches or more.
Whether you call them bubbles or blisters, the cause is always the same: something prevented the paint from bonding properly to the surface. That something is almost always moisture, heat, or poor prep.
What Causes Paint to Bubble on Exterior Walls?
Paint bubbles on exterior walls are caused by moisture trapped under the paint film, heat drying paint too quickly, dirty or poorly prepped surfaces, incompatible paint products, or applying paint in bad weather conditions. According to Rick Watson, director of product information at Sherwin-Williams, the most common and biggest mistake he sees is lack of preparation. Most people want to start painting right away without making sure the surface is clean, dry, and properly primed first.
Moisture and Water Intrusion
Moisture is the leading cause of bubbling paint on exterior walls. When water gets trapped beneath the paint film, it creates vapor pressure as it tries to escape. That pressure lifts the paint away from the surface, forming bubbles. According to PPG Paints, moisture retention is the driving force behind most outbreaks of blistering on both interior and exterior surfaces.
Water can get under exterior paint from several sources: roof leaks, clogged gutters overflowing onto siding, poorly sealed windows and doors, cracked caulking, high humidity that soaks into wood or masonry, or rain hitting fresh paint before it has cured. In the Lexington, SC area, where summer humidity stays high for months, this is a very common problem. Homes near Lake Murray and in wooded areas around Red Bank and Gilbert are especially prone to moisture-related paint failure because shade and humidity keep surfaces damp for longer periods.
Painting in Hot Weather or Direct Sunlight
Painting in extreme heat or direct sunlight causes the outer surface of the paint to dry too fast while the layer underneath is still wet. The trapped solvents and moisture have no way to escape, so they push through the top coat and create bubbles. According to BobVila.com, extreme heat shortly after a fresh paint job can cause the topcoat to dry unevenly at a faster-than-normal rate, leading to bubbling just underneath the surface.
According to This Old House, the ideal temperature range for exterior painting is between 50 and 85 degrees Fahrenheit. Painting on a surface that is above 90 degrees, in direct afternoon sun, or during the peak heat of a South Carolina summer afternoon is asking for paint bubbles.
Painting Over a Dirty or Contaminated Surface
Paint cannot bond properly to a dirty surface. Dust, grease, pollen, mildew, chalking (oxidation), and old flaking paint all prevent adhesion. According to Rick Watson of Sherwin-Williams, every surface must be washed and cleaned first, even before taping off areas. When paint is applied over contamination, it sticks to the dirt instead of the wall. When the dirt eventually loosens, the paint lifts with it and bubbles form.
Applying Paint Too Thickly
Applying paint in one thick coat instead of two thinner coats traps solvents and moisture inside the paint film. As those solvents try to escape during drying, they push up through the film and create air bubbles. According to Dry Force water damage experts, two thin coats are always better than one thick coat. This applies to both primer and topcoat.
Using Oil-Based Paint Over Latex Paint
Applying oil-based paint directly over existing latex (water-based) paint causes adhesion failure. The two types of paint do not bond to each other. According to The Family Handyman, oil-based paint cannot be used directly over water-based latex paint because the two layers will not adhere, and bubbles or blisters will form in the oil-based coat. Always check what existing paint is on the surface before choosing a new product.
Skipping Primer on Bare or Porous Surfaces
Bare wood, bare drywall, and other porous surfaces absorb the binders in paint before the top coat has a chance to bond. Without a primer seal, the base coat ends up thinner than it needs to be for the next coat to stick to. According to BobVila.com, where new paint does not stick to the base coat, it tends to lift and result in bubbling on the wall surface.
Does Bubbling Paint Always Mean Water Damage?
No, bubbling paint does not always mean water damage. Bubbles can also be caused by heat, poor prep, incompatible paint products, or applying paint in the wrong conditions. However, when bubbles appear on exterior walls, moisture is the most common culprit. According to Dunn-Edwards Paints, you can determine the cause by breaking open a blister and inspecting the underside. If only the newest coat of paint is blistered, the cause was likely heat. If the peeled blister reveals several older coats of paint and the bare surface beneath, the cause was moisture coming from inside the wall or substrate.
Water-related bubbling is more serious because it signals that water has breached the wall’s protective barrier. According to SERVPRO, when water damage occurs inside a wall, it stretches the paint on the outside, creating bubbles of varying sizes that can pop and cause even more damage. Left untreated, trapped moisture weakens drywall, rots wood framing, and creates the perfect conditions for mold to grow.
Does Bubbling Wall Paint Mean Mold?
Bubbling wall paint does not always mean mold, but it can be a warning sign. When moisture is trapped behind exterior walls for an extended period, mold spores can grow within 24 to 48 hours according to Dry Force Corp. According to SERVPRO, mold growth is a major sign of water-damaged walls and often grows at the seams where walls meet ceilings and floors, near the same areas where bubbling paint first appears.
Signs that bubbling paint may be linked to mold include a persistent musty smell near the affected area, dark spots or patches visible around the bubbles, soft or spongy drywall when pressed, and yellow or brown staining around the blistered area. If you see any of these signs alongside the bubbles, the repair goes beyond just fixing the paint. The moisture source and any mold must be addressed before repainting. If mold is suspected, calling a professional is strongly recommended before starting any surface repairs.
Important: If the bubbled area is large, the wall feels soft when pressed, or you smell a musty odor near the damage, do not just scrape and repaint. These signs point to active moisture intrusion or mold behind the wall that must be addressed first. Painting over active moisture will cause the bubbles to return every time.
Will a Bubble Blister Go Away on Its Own?
A bubble blister will not go away on its own once the paint has fully cured. As mentioned above, the only time bubbles may resolve without intervention is in the first few hours after painting, if mild rain caused temporary blistering before the paint dried. Once the paint is hardened and the bubbles are set in place, they are permanent until manually removed. According to Sherwin-Williams, ignored bubbles will only get larger or burst over time, which leads to more peeling, more cracking, and a more expensive repair job down the road.
How to Flatten Bubbled Paint on Exterior Walls
You cannot flatten bubbled paint by pressing it back down. The paint has lost its bond to the surface beneath it. The only way to fix it is to remove the damaged paint, prepare the surface, and repaint. Here is the correct process from start to finish.
Step 1: Find and Fix the Root Cause
Before touching the surface, identify what caused the bubbles. Check the gutters for clogs and overflow. Inspect the roof for missing or damaged shingles. Check caulking around windows and doors for cracks or gaps. Look for signs of leaking plumbing. Press on the wall near the bubbles and check for softness that signals moisture behind the surface. According to Restoration 1, the bubble will always return if the underlying issue is not fixed first. Skipping this step wastes every dollar spent on materials and labor.
For cases where moisture is coming from inside the wall due to plumbing, a roof leak, or failed caulking, fix those problems completely and allow the wall to dry before doing any paint work. Professionals use moisture meters to confirm the wall is fully dry before repainting.
Step 2: Let the Wall Dry Completely
The wall must be completely dry before any scraping, sanding, or painting begins. Use fans, dehumidifiers, and open ventilation to speed up drying. According to PuroClean, moisture content in wood should be below 16 percent and below 1 percent for drywall before proceeding with repairs. Rushing this step is one of the biggest reasons bubbles come back after a repair.
Step 3: Scrape Away the Damaged Paint
Use a putty knife or paint scraper to remove all bubbled, blistered, and peeling paint from the affected area. Work with a gentle vertical or horizontal motion to avoid gouging the surface. Remove everything that is loose or lifting. According to PPG Paints, all areas of paint separation must be removed before the surface can be properly repaired. Do not just scrape the tops of the bubbles. Remove all damaged material back to a firm, solid edge.
Step 4: Sand the Area Smooth
After scraping, sand the scraped area with fine-grit sandpaper to smooth rough edges and feather the transition between the old paint and the bare surface. This prevents a visible ridge under the new paint. Wipe the sanded area clean with a dry cloth to remove all dust before moving on.
If the scraping revealed bare wood that looks weathered, damaged, or has moisture staining, additional prep may be needed. For walls where the damage goes deeper, drywall repair and painting is the right next step before any topcoat goes on.
Step 5: Treat for Mold If Present
If scraping revealed dark spots, discoloration, or mildew on the surface, apply a mold-killing solution to the area. Let it work according to the product’s instructions and allow the surface to dry completely. Do not paint over any mold or mildew. Sealing it under paint does not eliminate it. It will continue to grow beneath the surface and cause the paint to fail again.
Step 6: Apply a Stain-Blocking Primer
Once the surface is clean, dry, and smooth, apply a stain-blocking primer. According to Sherwin-Williams, use a primer specifically designed for water-damaged surfaces when moisture was the cause of the bubbling. This type of primer seals the substrate, prevents stains from bleeding through, and gives the topcoat a stable, firmly bonded surface to adhere to. Let the primer dry fully according to the manufacturer’s instructions before painting.
Step 7: Repaint with High-Quality Exterior Paint
Apply two thin, even coats of high-quality 100% acrylic exterior paint. Start at the top and work downward. Let each coat dry completely before applying the next. Do not paint in direct sunlight or when temperatures are above 90 degrees. For best results, paint in the morning on a dry, overcast day when humidity is lower. According to Dunn-Edwards, the surface temperature should be below 90 degrees Fahrenheit when applying the final coat.
For a full-home exterior refresh that ensures every surface is properly prepped and painted for South Carolina’s weather, professional exterior painting services handle the entire process from diagnosis to final coat.
How to Repair Blistered Paint: The Step-by-Step Summary
| Step | What to Do | Why It Matters |
|---|---|---|
| 1 | Find and fix the root cause (leak, heat, bad prep) | Bubbles return if the cause is not addressed |
| 2 | Let the wall dry completely | Painting over moisture causes immediate reblistering |
| 3 | Scrape all bubbled and peeling paint | New paint cannot bond over loose old paint |
| 4 | Sand smooth and wipe clean | Removes ridges and prep debris for a flat surface |
| 5 | Treat for mold if visible | Mold grows under sealed paint and causes more damage |
| 6 | Apply stain-blocking primer | Seals the substrate and improves paint adhesion |
| 7 | Apply two coats of 100% acrylic exterior paint | Two thin coats bond better and last longer than one thick coat |
Sources: Sherwin-Williams, PPG Paints, Benjamin Moore, Dunn-Edwards Paints, Dry Force Corp, PuroClean, The Family Handyman (2024)
Can You Paint Over Bubbling Paint?
No, you cannot just paint over bubbling paint and expect the problem to go away. Painting directly over bubbles traps the existing failure under the new coat. The new paint will bubble in the same spots because the root cause and the damaged layer are still there. According to Paintzen, you could paint over it to smooth the surface temporarily, but the troublesome blisters would likely reemerge. The only way to fix bubbling paint for good is to remove it, fix the cause, and start fresh with proper prep and primer.
Can I Just Paint Over Old Exterior Paint?
You can paint over old exterior paint if it is firmly bonded, clean, and in good condition. But if the old paint is peeling, bubbling, chalking, or flaking, you must remove the damaged sections before repainting. According to Angi, failing to sand down imperfections like chips, cracks, and bubbles in old paint results in the same issues in the new coat. Painting over damaged layers traps existing problems underneath and causes bubbling, peeling, and an uneven appearance in the new coat.
If the old paint is simply faded but still firmly attached and the surface is clean, a fresh coat of exterior acrylic paint after a good wash and light sanding can work well. When in doubt, run your hand across the surface. If chalky white residue comes off, the surface needs full cleaning and priming before new paint will stick.
What Exterior Paint Lasts 25 Years?
No standard exterior paint product reliably lasts 25 years on a home’s walls under normal conditions. Most high-quality 100% acrylic exterior paints are rated to last 10 to 15 years on properly prepped surfaces, and 5 to 10 years in demanding climates with heavy UV exposure, heat, and humidity like Lexington, SC. Some premium products from Sherwin-Williams, Benjamin Moore, and Behr carry manufacturer warranties for extended performance, but real-world results depend heavily on surface prep, application technique, paint quality, and climate.
According to This Old House paint expert Mauro Henrique, a well-executed exterior paint job using high-quality 100% acrylic paint can last between 10 and 12 years. The path to paint that lasts as long as possible is not chasing a magic product; it is thorough prep, quality materials, proper application, and regular maintenance.
What Color Makes a House Look Expensive?
The colors that make a house look expensive are sophisticated neutrals with depth: soft whites, warm greiges (gray-beige blends), dark charcoal on accents, and muted sage or olive greens. These shades look intentional, polished, and timeless. According to Angi survey data, when homeowners repaint their exterior, nearly 30 percent choose a lighter color than their existing one, which tends to give homes a fresher, more elevated appearance.
Pairing a neutral body color with contrasting trim is what separates a flat, forgettable exterior from one that looks high-end. A clean white trim against a soft gray or warm greige body color creates definition, sharpens architectural lines, and adds the visual detail that makes a house look custom. In the Lexington, SC market, this combination also tends to perform well with buyers and appraisers alike.
Choosing the right color is only half the job. The actual finish quality matters just as much. Even a perfect color choice will look cheap if the surface was not prepped well or the paint was applied unevenly. Professional house painting delivers the clean lines and even coverage that makes any color look its best.
Why Are Some Colors Not Recommended for Exterior Walls?
Some colors are not recommended for exterior walls because they absorb too much heat from the sun, which causes the paint and the material beneath it to expand and contract more aggressively. Very dark colors like deep black, dark charcoal, and dark navy can cause wood siding to warp, vinyl siding to buckle, and paint to crack and peel much faster than lighter alternatives. According to Lowe’s, darker paint absorbs more heat from the sun, which can cause the underlying material to expand and lead to paint bubbling. On homes in the South where summer temperatures regularly push above 90 degrees, dark exterior colors carry real risk without specifically formulated heat-resistant paint products.
Colors with high sheen can also look harsh and show every surface imperfection. Flat and satin finishes are generally preferred for exterior siding because they hide minor surface irregularities and do not reflect light in a way that draws attention to flaws. According to True Value, satin finishes are a good choice when siding is in good condition, while flat sheens help camouflage imperfections on older or more worn surfaces.
When Not to Paint the Exterior
You should not paint the exterior when temperatures are below 50 degrees Fahrenheit or above 90 degrees, when rain is expected within 24 to 48 hours, when the surface is wet or damp, when humidity is very high, or when strong winds are present. Painting in any of these conditions leads to poor adhesion, uneven drying, and paint that bubbles, peels, or does not cure properly.
In Lexington, SC, that rules out most summer afternoons when temperatures and humidity are both high. The best windows for exterior painting in the Lexington area are spring mornings from late March through May, and fall mornings from September through early November when temperatures are mild and humidity drops. Overcast days with no rain in the forecast for 48 hours are ideal.
Timing your painting project well is one of the best things you can do to prevent bubbling from happening in the first place. All the great prep work in the world cannot overcome bad weather conditions during application. Decks and fences painted at the wrong time of year face the same risk. Properly timed deck and fence painting protects the wood and keeps the finish lasting as long as possible.
What Is the Best Month to Paint the Outside of Your House?
The best month to paint the outside of your house in South Carolina is October. Temperatures across the Lexington, SC area in October average in the 60s and low 70s during the day, which falls right in the ideal painting range of 50 to 85 degrees Fahrenheit. Humidity is lower than summer months, there is less direct sun intensity, and the risk of afternoon thunderstorms is reduced compared to the summer season.
April and early May are also excellent windows in the Midlands. The key in any month is to watch the forecast carefully, avoid days with rain expected within 48 hours, and work in the morning before afternoon heat peaks. Avoid painting in the depths of summer from June through August when Lexington temperatures routinely climb above 90 degrees and humidity stays high all day.
For sheds and smaller outbuildings, the same seasonal rules apply. Shed painting done in the right conditions bonds better, lasts longer, and requires fewer touch-ups over the coming years.
Frequently Asked Questions About Bubbling Exterior Paint in Lexington, SC
Is October too late to paint outside in Lexington, SC?
No, October is not too late to paint outside in Lexington, SC. October is actually one of the best months to paint in the Lexington area. Daytime temperatures typically stay in the ideal 60 to 75-degree range, humidity is lower than summer months, and afternoon storms are less frequent. As long as overnight temperatures stay above 50 degrees and no rain is expected for 48 hours, October is a reliable painting window. Just keep an eye on overnight lows as November approaches.
Why does my exterior paint keep bubbling in the humid Lexington summers?
Your exterior paint keeps bubbling in the Lexington summers because of the combination of high humidity and intense heat. According to PPG Paints, hot weather conditions cause the thinners mixed with fresh paint to vaporize and expand outward, and high humidity traps moisture beneath the paint film. In Lexington, SC, painting on a 90-degree afternoon with 80 percent humidity is one of the fastest ways to create bubbles. Paint during cooler, lower-humidity mornings and allow full dry time between coats to prevent this problem.
Can bubbling exterior paint near Lake Murray be caused by moisture from the water?
Yes, proximity to Lake Murray can contribute to exterior paint bubbling. Homes near the lake experience higher ambient humidity, more frequent morning dew and condensation, and shade from surrounding trees that keeps siding damp for longer periods. According to industry experts, moisture retention is the driving force behind most exterior paint blistering. Homes near lakes, rivers, and wooded areas should use 100% acrylic exterior paint with strong moisture resistance, pay extra attention to caulking and sealing around windows and trim, and ensure gutters are clean and draining properly away from the foundation.
How do I know if bubbling paint on my Lexington home means mold behind the wall?
You can check for signs of mold behind a bubbling wall by pressing the wall gently near the bubbles. If the drywall feels soft or spongy, moisture has likely soaked in. Other signs include a musty smell near the affected area, yellow or brown staining around the blistered spots, and dark patches or spots visible after scraping the paint away. According to Dry Force Corp, mold can develop within 24 to 48 hours of moisture exposure. If you see or smell any of these signs in your Lexington home, call a professional before doing any paint repair.
Can I fix a small section of bubbling exterior paint myself?
Yes, you can fix a small section of bubbling exterior paint yourself if the root cause is something simple like rain hitting fresh paint or painting in too much heat. Scrape the damaged area, sand smooth, apply primer, and repaint with two thin coats of 100% acrylic exterior paint. However, if the bubbles cover a large area, the wall feels soft, or you suspect moisture intrusion from a roof leak or plumbing issue, professional help is the right call. Improper repairs to moisture-damaged walls can lead to mold, structural damage, and much higher repair costs down the road.
Does bubbling paint affect the value of a home in the Lexington area?
Yes, bubbling paint affects the perceived value of a home in Lexington, SC. Bubbling and peeling exterior paint signals deferred maintenance to buyers, appraisers, and real estate agents. According to real estate and painting industry sources, fresh exterior paint is one of the highest-return improvements a homeowner can make before listing a property. Realtors and buyers in the Lexington market notice exterior condition immediately, and visible paint failure raises questions about what other maintenance may have been skipped. Fixing bubbling paint before listing or appraising a home protects both curb appeal and market value.
Should I call a professional painter to fix bubbling exterior paint on my home?
You should call a professional painter to fix bubbling exterior paint when the affected area is large, when moisture intrusion may be the cause, or when the bubbles keep coming back after DIY repairs. Professionals have the experience to identify the true root cause of the problem, including hidden moisture issues that DIY repairs frequently miss. A licensed painter will use the right primer and paint for the specific surface and conditions, and will apply it correctly to prevent the problem from recurring. For homes in Lexington, Red Bank, and the Gilbert area, proper exterior prep and paint application makes the difference between a fix that lasts and one that fails within a season.
Final Thoughts: Stop Bubbling Paint Before It Gets Worse
Bubbling paint on exterior walls is not just an eyesore. It is a signal that something went wrong with the prep, the application, or the surface itself, and it will keep getting worse if ignored. The fix is always the same: find the cause, dry the surface completely, scrape and sand the damage, prime correctly, and repaint with a high-quality 100% acrylic exterior product. Done right, the repair holds for years. Done wrong, the bubbles come back before the season ends.
If your Lexington home is showing bubbling, peeling, or blistering exterior paint, the team at Soda City Painting is here to help. We serve homeowners across Lexington, Red Bank, Gilbert, and the Lake Murray area with professional exterior painting and surface repairs done the right way from the start. Do not wait for small bubbles to turn into large peeling sections or hidden moisture damage. Call us today at (803) 221-0771 or visit our exterior painting services page to schedule your free estimate.