You can patch large holes in drywall yourself with a few basic tools, a piece of replacement drywall, backing support, joint compound, and patience. Holes bigger than 4 to 6 inches need a proper drywall patch screwed into backing boards or studs, not just spackle or mesh tape. This guide walks you through every repair size, from small nail holes to large wall sections, with the exact steps professionals use to make the repair invisible once painted.
How to Patch Large Holes in Drywall: What You Need to Know First
To patch large holes in drywall, you need to cut the damaged area into a clean square or rectangle, install backing support behind the wall, cut a replacement drywall piece to fit, tape the seams, and apply multiple thin coats of joint compound. According to This Old House’s Tom Silva, failing to secure large patches causes future sagging or cracking, and neglecting to prime the patched area before painting leads to visible differences in sheen. Getting the prep and the process right from the start is what makes the repair disappear.
Holes in drywall come in many sizes, and the right repair method depends on the size. Using the wrong approach for a large hole is the most common DIY mistake homeowners in Lexington, Red Bank, and the surrounding area make. The chart below shows which method fits which hole size.
| Hole Size | Best Repair Method | Key Materials Needed |
|---|---|---|
| Under 1/2 inch (nail holes) | Spackle only | Lightweight spackle, putty knife |
| 1 to 4 inches | Self-adhesive mesh patch + joint compound | Mesh patch kit, joint compound, putty knife |
| 4 to 6 inches | California Patch method | Drywall scrap, utility knife, joint compound |
| 6 inches and larger | Full drywall patch with wood backing or drywall clips | Drywall panel, backer boards, screws, tape, joint compound |
Sources: DAP Global, This Old House, Bob Vila, Benson Drywall, Family Handyman
What Tools Do You Need to Patch a Large Hole in Drywall?
The tools you need to patch a large hole in drywall are a utility knife or drywall saw, a stud finder, drywall screws, a screwdriver or drill, drywall tape (paper or mesh), a putty knife, a wide taping knife (6 inch and 10 inch), sandpaper in 100-grit, a sanding block, and a mud pan. You will also need a piece of drywall sized to match the hole and one or two wood backing boards, such as 1×2 or 1×3 lumber, cut a few inches longer than the height of the hole.
Having the right knife sizes matters more than most DIYers realize. According to Family Handyman, flexible 6-inch and 10-inch taping knives give the smoothest results when applying and feathering joint compound. A too-small knife forces you to work in tight passes that create ridges and visible edges after paint.
How Big of a Hole Is Too Big to Patch Drywall?
No hole is too big to patch in drywall as long as there is sound wall structure around it to anchor backing boards or studs. Even very large holes, such as a 2-foot opening, can be repaired successfully by cutting the damaged section back to the nearest studs and installing a full replacement drywall panel between them. According to Bob Vila, the key is having a surface to which the replacement drywall can be securely fastened. Without backing, the patch will flex, crack, and eventually fail.
The real limit is not hole size but wall condition. If the drywall around the hole is soft, saturated with moisture, or crumbling, the damaged section needs to be cut back further to solid material before any patch goes in. Homes in Lexington, SC and the Lake Murray area with moisture issues in walls often need more material removed than the visible hole suggests.
For holes caused by water damage, fixing the source of moisture first is critical. Patching over a water-damaged area without addressing the leak means the patch will fail again. If you have water-damaged wall sections, sheetrock repair and installation done by a professional is often the smarter choice to make sure the fix is done correctly the first time.
How to Fix a Really Big Hole in the Wall: Step-by-Step
To fix a really big hole in the wall, follow these steps in order. Cutting corners on any step is what leads to visible cracks and bumps after paint.
Step 1: Check for Wires and Utilities Behind the Wall
Before cutting into any wall, use a stud finder to locate wall studs and check for electrical wires or plumbing inside the wall cavity. According to Lowe’s home improvement guidance, wires are typically attached to studs, and turning off the main power supply before cutting is the safe approach. Make a shallow score cut with a utility knife first rather than plunging a saw blade straight through.
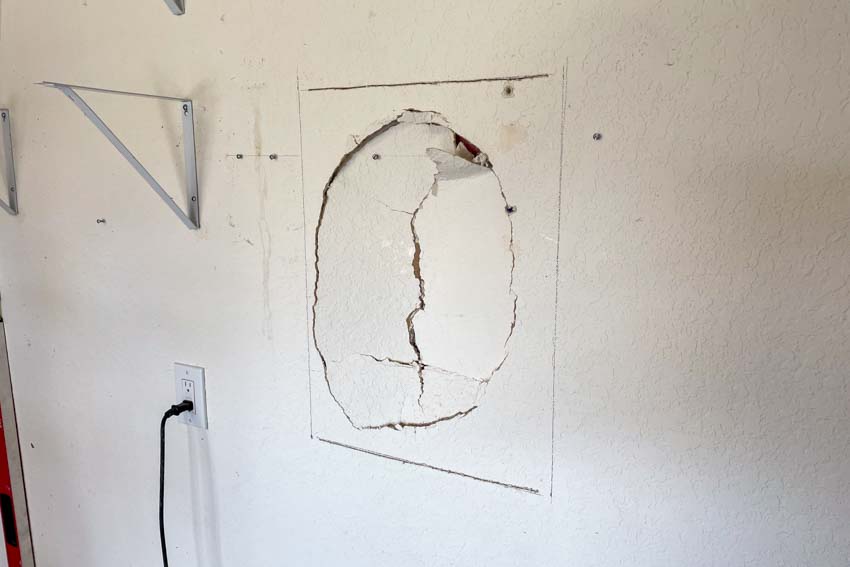
Step 2: Cut the Damaged Area into a Clean Square or Rectangle
Use a drywall saw or utility knife to cut evenly around the damaged area, creating a clean square or rectangle with straight edges. Straight edges make it much easier to fit the replacement piece precisely. According to Benson Drywall, if reaching studs on both sides of the hole is not practical, you will need to install backing support behind the hole to give the patch something solid to anchor to.
Step 3: Install Wood Backing Boards Behind the Hole
Cut two backer boards from 1×2 or 1×3 lumber, each about 4 inches longer than the height of the hole. Slide each board behind the wall on the left and right sides of the hole, centering them vertically so they overlap the existing drywall on each side. Hold each board tight against the back of the drywall while driving drywall screws through the existing wall into the board from the front. This creates the mounting surface for the replacement drywall patch. According to Family Handyman, pine or other soft wood works well for these backing boards.
Step 4: Cut and Install the Replacement Drywall Patch
Measure the rectangular opening carefully and cut a piece of drywall to match. The fit should be snug with minimal gaps at the edges. Set the patch into the opening and drive drywall screws into the backing boards along all four edges, spacing screws about 6 inches apart. Drive each screw just deep enough to create a slight dimple in the drywall face without breaking the paper surface. According to Family Handyman, most standard walls use 1/2-inch-thick drywall, so match that thickness when buying replacement material. Many home improvement stores sell 2×2-foot pieces for repairs, which is cheaper than buying a full 4×8 sheet.
Step 5: Apply Paper Tape and First Coat of Joint Compound
Lay a thin bed of joint compound over each seam and press paper tape into it with a 6-inch knife. Immediately apply a thin layer of compound on top of the tape, smoothing it flat. According to Family Handyman, paper tape is stronger than mesh tape for large repairs, because mesh tape can crack over seams that experience any movement. Let this first coat dry completely, which typically takes about 8 to 24 hours depending on temperature and humidity.
In Lexington, SC’s humid summer months, drying times can run longer than the manufacturer’s estimate on the label. Give the first coat extra time before applying the next. Rushing the process causes the compound to crack as it dries.
Step 6: Apply Second and Third Coats of Joint Compound
Apply a second coat of joint compound over the seams, drawing it at least 6 inches beyond the edge of the first coat to taper and feather the edges. According to Family Handyman, this feathering step is what makes the repair invisible after painting. Let it dry fully, then apply a third coat to smooth any remaining uneven areas. Each coat should be thinner and wider than the one before it. Also fill the screw dimples with joint compound, slightly overfilling on the first coat since compound shrinks as it dries.
Step 7: Sand, Prime, and Paint
Once the final coat is fully dry, sand lightly with 100-grit sandpaper to remove ridges and blend the edges into the surrounding wall. Wipe dust off with a damp cloth and let the surface dry. Apply a coat of drywall primer before painting. According to This Old House, neglecting to prime the patched area before painting leads to visible differences in sheen between the patch and the rest of the wall. Prime the entire patch area, then paint to match.
What Is the California Patch Method for Drywall?
The California Patch method is a technique for patching drywall holes between 4 and 6 inches wide that uses the drywall patch itself as the backing, eliminating the need for separate backer boards. To do it, cut a piece of drywall a few inches larger than the hole on all sides. Score the back of that piece about 1 inch from each edge and snap the gypsum core away while leaving the paper face intact. You end up with a gypsum center piece surrounded by a 1-inch paper border. Trace the gypsum portion onto the wall around the hole, cut out just that area, and insert the patch so the paper border overlaps and adheres flat against the existing wall surface. Cover the whole thing with joint compound and feather the edges. According to both This Old House and Lowe’s, the paper border acts as the tape and the bonding layer at the same time, making this one of the fastest clean methods for mid-sized holes.
Should I Use Mesh Tape on Large Wall Holes?
No, you should not use mesh tape alone on large wall holes. Mesh tape is suitable for holes up to about 4 inches wide, but it is not strong enough for larger repairs. According to Family Handyman, paper tape is stronger than mesh tape and is the better choice for large patches and seams because it resists cracking over time. Mesh tape works well for medium holes because it reinforces the damaged area, prevents cracks, and provides a strong base for compound without needing backing support inside the wall, according to Benson Drywall. For anything larger than that, use paper tape over backing-supported drywall patches for a repair that stays solid for years.
Is It Better to Use Spackle or Drywall Mud for Large Holes?
It is better to use drywall mud (joint compound) for large holes, not spackle. Spackle is designed for small repairs like nail holes and minor dents. According to HGTV’s comparison of the two products, joint compound is the right choice for large repair and patch jobs because it spreads over large areas more smoothly, accepts paper tape, feathers out at the edges more cleanly, and is easier to sand. Spackle dries too fast for large areas, making it hard to work and hard to feather into the surrounding wall.
Spackle dries within 30 minutes for small patches. Joint compound takes 8 to 24 hours per coat. That slower dry time is actually an advantage on large repairs because it gives you time to work the compound smooth before it sets. According to Bob Vila, joint compound is extraordinarily durable, easy to sand down, and accepts multiple layers well, which is exactly what large drywall repairs require.
What Filler Is Best for Large Wall Holes?
The best filler for large wall holes is all-purpose joint compound used in multiple thin coats over a properly backed drywall patch. For the first coat over seams and tape, all-purpose joint compound bonds the tape and fills the gaps. For the final smoothing coat, lightweight joint compound or a topping compound gives a finer finish that sands easily. According to Angi’s product comparison, joint compound is available in all-purpose, taping, topping, and quick-setting types, which adds to its versatility for different stages of the repair process.
How Big of a Hole Can You Fill with Spackle?
You can fill holes up to about 3 to 4 inches wide with spackle if you use a large-hole repair spackle product with a mesh backing. According to Bob Vila, large-hole repair spackle kits, such as the 3M High Strength Large Hole Repair Kit, are specifically made for holes up to 3 inches wide and typically include a small mesh piece to provide backing for the spackle. Beyond 4 inches, joint compound with a proper drywall patch is the correct approach. Standard lightweight spackle from a small tub is only for nail holes, minor dents, and surface cracks, not for holes with missing drywall material.
What Do Professional Painters Use to Fill Nail Holes?
Professional painters use lightweight spackle to fill nail holes before painting. Lightweight spackle is fast, dries in as little as 30 minutes for small repairs, shrinks very little compared to joint compound, and sands smooth easily. According to Angi, spackle is designed specifically for finished walls to fix the everyday dings and nail holes of daily life. A small amount is applied with a putty knife or even a finger, slightly overfilled, left to dry, then sanded flush and painted. For multiple nail holes across a room, this process can be completed in under an hour before the painting crew starts their work.
Painters in the Lexington area often handle these minor repairs as part of the painting process, especially during move-in and move-out jobs where walls have accumulated small holes from picture hooks and hardware over the years.
What Is a Common Mistake People Make When Applying Mud to Drywall?
The most common mistake people make when applying mud to drywall is putting it on too thick in a single coat. Joint compound shrinks as it dries. A thick coat shrinks unevenly, leaving low spots, cracks, and a surface that never looks truly flat even after sanding. According to This Old House, insufficient sanding between coats is the other major mistake, resulting in visible bumps and ridges under paint. The professional approach is always thin coats, full drying time between each, and light sanding before the next coat goes on.
Overworking wet mud is another trap. Once joint compound starts to stiffen, working it further tears the surface and creates drag marks. Apply it smoothly and leave it alone to dry. Multiple light passes give better results than one heavy attempt at perfection on the first coat.
What Are Common Drywall Patching Mistakes?
Common drywall patching mistakes are skipping the primer coat before painting, not installing backing support for large patches, using mesh tape where paper tape is needed, rushing between coats before the compound is fully dry, and not feathering the compound far enough from the patch edge. According to This Old House, failing to secure large patches causes future sagging or cracking. Insufficient sanding between coats results in visible bumps that show through even thick paint. Each mistake is avoidable with patience and the right order of steps.
Homeowners in Gilbert and Red Bank who have tried DIY patches and been disappointed by the results have typically run into one or more of these mistakes. The good news is that joint compound can be applied over a failed patch once the surface is sanded back to a stable state and all loose material is removed.
Why Put Dawn Dish Soap in Drywall Mud?
Some professional drywall finishers and experienced tradespeople put a small amount of Dawn dish soap in drywall mud to make the final coat smoother, reduce air bubbles and pockmarks, and make the compound easier to float and feather out. According to Fine Homebuilding’s discussion of this practice, detergent reduces the surface tension of water molecules inside the compound, which helps the mud penetrate the paper face of drywall and creates a better bond. It also makes tools easier to clean when the job is done.
That said, this is a practice that has real disagreement in the trades. Some experienced contractors warn that dish soap can weaken adhesion between the compound and the wall surface, and that it is not approved by drywall compound manufacturers like USG. According to JLC Online forum discussions, the safer alternative is to properly thin joint compound with a small amount of clean water and mix it thoroughly with a paddle drill to eliminate air bubbles, rather than adding any outside substance. If you do use it, the professional guidance is to use only a tiny amount on the final coat only, not on the taping coats. A small amount on the finish coat is more forgiving than using it throughout the entire repair.
How to Patch a 2-Foot Hole in Drywall
To patch a 2-foot hole in drywall, use a stud finder to locate the nearest wall studs on both sides of the damage. Extend your cuts to the center of those studs so the replacement panel has solid framing to screw into on both left and right sides. Cut horizontal backer boards to span the top and bottom of the opening and screw them in from the front before installing the new drywall. Cut a replacement drywall piece to fit the rectangular opening exactly, screw it into the studs and backer boards, tape all seams with paper tape, and apply three coats of joint compound, sanding between each coat. Prime and paint to finish.
A repair this size is well within DIY range if you have a full free weekend. The taping and mudding coats with full drying time between them are what make it a multi-day project. Do not rush the drying. Trying to apply the second coat before the first is dry is the most common reason large patches crack and have to be redone.
For badly damaged walls or rooms that need new drywall across larger sections, professional drywall repair and painting combined in one service saves time and produces a cleaner result than tackling the two jobs separately.
How to Patch a Large Hole in Drywall at Home Depot
You can buy everything needed to patch a large hole in drywall at Home Depot in a single trip. The materials list includes a 2×2-foot drywall panel or a scrap cut to size, 1×2 or 1×3 furring strips for backing, drywall screws, a box of all-purpose joint compound (pre-mixed, not powder), paper tape, a 6-inch and 10-inch taping knife, 100-grit sandpaper, and drywall primer. Many stores also carry patch kits with mesh and compound for medium holes, which are fine for anything under 4 inches. According to Family Handyman, most home centers sell 2×2-foot drywall pieces for larger repairs, which is cheaper and easier than buying a full 4×8 sheet just for a single patch job.
One thing to watch when buying joint compound: pre-mixed all-purpose compound in a green-lidded bucket is the most forgiving for DIY use. Quick-setting powder compounds, such as Sheetrock 20 or 45, set by chemical reaction rather than drying, which means they harden in 20 or 45 minutes regardless of how wet they are. These are better for filling deep voids before your finish coats, but they are harder to sand. Save those for the first fill coat on very large repairs and use regular all-purpose mud for the finishing coats.
How to Fill Large Holes in Walls DIY: Pro Tips for Better Results
To fill large holes in walls yourself and get a professional-looking result, follow these tips from experienced tradespeople.
Always sand between coats. A quick light pass with 100-grit sandpaper between coats knocks down any ridges or tool marks before they get buried under the next layer. Skipping this step is the fastest way to end up with a lumpy wall even after three coats of mud.
Feather further than you think you need to. Most DIYers feather their compound too close to the patch. Each coat should extend 4 to 6 inches wider than the coat before it. This gradual taper is what makes the patch disappear. A patch that ends abruptly will always be visible under paint, especially in raking light from a nearby window.
Use a primer before painting. This step is non-negotiable. Joint compound is very porous and absorbs paint differently than the surrounding painted wall does. If you paint directly over unprimed compound, the patched area will look flat or dull compared to the rest of the wall, a difference called flashing. One coat of drywall primer fixes this completely.
Texture matching is the last challenge. If your walls have an orange peel, knockdown, or other texture, you will need to apply matching texture over the patch before painting. Aerosol texture sprays are available at most home improvement stores and work well for small to medium patches on standard wall textures common in Lexington area homes.
If the repair is in a high-traffic area like a hallway, or if the wall has significant damage across multiple areas, the most cost-effective path is often a professional finish. A crew that does residential painting and repair can handle the drywall work and the paint in one visit, leaving the wall looking like nothing ever happened.
Frequently Asked Questions
How do I patch a large drywall hole in a Lexington, SC home without seeing the seams after painting?
To patch a large drywall hole without seeing seams after painting, the key is multiple thin coats of joint compound, each one feathered wider than the last, followed by a coat of drywall primer before paint. According to This Old House, neglecting to prime the patched area before painting is one of the most common reasons repairs remain visible. In Lexington, SC homes, where humidity can slow drying times during summer months, giving each coat the full time it needs to dry before sanding and recoating is especially important. Rushing the process in humid weather is the number one reason DIY patches crack or show seams.
How big of a hole is too big to patch drywall yourself?
There is no size of drywall hole that is definitively too big to patch yourself, as long as there is sound wall structure around it to install backing boards or reach wall studs. Even a 2-foot hole can be repaired correctly with backing boards, a replacement drywall panel, paper tape, and multiple coats of joint compound. The repairs become more involved as the hole grows, and the margin for error gets smaller. If the hole involves water damage, mold, or structural issues behind the wall, that is when it makes sense to call a professional.
Do I need to prime a drywall patch before painting in the Red Bank area?
Yes, you need to prime a drywall patch before painting regardless of where you are. Fresh joint compound is porous and absorbs paint differently than surrounding painted surfaces, causing the patch to look flat or dull after painting, a defect called flashing. According to This Old House, this is one of the most common finishing mistakes DIYers make. One coat of drywall primer seals the repaired area and creates a uniform surface so paint goes on evenly across the whole wall. This is especially important in the Red Bank and Lexington area, where variable humidity can affect how compound cures at the surface level.
How long does drywall joint compound take to dry between coats?
Drywall joint compound typically takes 8 to 24 hours to dry between coats under normal conditions. According to Bob Vila, the compound needs to go from its applied color to a uniform white or very light color before the next coat is applied. In humid conditions, such as those common in Lexington, SC during summer, drying can take longer than the manufacturer’s estimate. Running a fan in the room or keeping the HVAC running to maintain airflow speeds up drying. Never apply a new coat over compound that still looks wet or dark in any spots. A coat that is 90% dry and 10% still wet will trap moisture and crack as it finishes curing.
Is it worth calling a professional for drywall repair in the Gilbert or Lake Murray area?
Yes, it is worth calling a professional for drywall repair in the Gilbert or Lake Murray area when the damage is large, involves moisture, affects multiple walls, or when you need a seamless finish for a room that will be painted immediately after. DIY drywall patching has a learning curve, and the finishing coats in particular take practice to do invisibly. A professional who handles both the drywall repair and the painting as one job leaves the wall looking like it was never touched. This is especially valuable in higher-end homes around Lake Murray and Lexington where wall quality directly affects how the finished space looks and feels.
Can I use mesh tape instead of paper tape for a large drywall patch?
No, you should not use mesh tape instead of paper tape for a large drywall patch. Mesh tape is appropriate for holes up to about 4 inches wide. According to Family Handyman, paper tape is stronger than mesh tape and is the better choice for large patches because it resists cracking over seams that experience any flexing or movement. Mesh tape can crack over time on large repairs where the patch and surrounding drywall expand and contract differently. Use paper tape embedded in joint compound for all seams on patches larger than 4 to 6 inches for a repair that holds for years.
What should I do if my drywall patch keeps cracking after it dries?
If your drywall patch keeps cracking after it dries, the most likely cause is applying the joint compound too thick in a single coat. Thick coats shrink unevenly as the water evaporates, creating stress cracks. The fix is to sand the cracked area back to a smooth, stable surface and restart with thin coats, letting each one dry fully before adding the next. Cracking near the seams can also indicate that the backing support is not rigid enough and the patch is moving slightly as it dries. In the Lexington area, applying mud in very humid conditions without adequate airflow can also trap moisture inside a thick coat and cause cracking as it dries from the outside in.
Final Thoughts
Patching large holes in drywall yourself is completely doable with the right materials, the right method for the size of the hole, and enough patience to let each coat of joint compound dry fully before moving on. The process is not complicated, but it does reward careful prep, proper backing support, paper tape over mesh for large repairs, and the discipline to apply thin coats and sand between them. Priming before painting is the final step that makes the whole repair disappear.
If you have significant drywall damage, water-damaged walls, or rooms that need both repair and a fresh coat of paint, getting it all done by professionals saves time and guarantees a seamless result. Soda City Painting’s drywall repair and painting services cover everything from patching and texture matching to a full professional repaint, serving Lexington, Red Bank, Gilbert, Lake Murray, and the surrounding Columbia area.
Call Soda City Painting today at (803) 221-0771 or reach out online to schedule a free estimate. A professionally finished repair is invisible. Let us make your walls look like nothing ever happened.