To repair drywall seam tape that is peeling, you cut away the loose tape with a utility knife, sand the exposed joint compound smooth, apply a fresh thin bed coat of joint compound over the seam, press new tape firmly into the wet compound, apply a second coat over the tape while feathering the edges, let it dry fully, sand it flush, prime the area, and then paint to match the surrounding wall. Peeling drywall tape is a very common problem in homes across Lexington, South Carolina. The combination of warm summers, high humidity, and normal house settling creates exactly the conditions that cause tape to lose its bond over time. This article covers every step of the repair process, the most common causes of peeling tape, the best tape and compound choices for lasting results, and answers to the most common questions homeowners ask about this issue.
Can You Fix Peeling Drywall Tape?
Yes, you can fix peeling drywall tape. Most peeling tape repairs are manageable and do not require replacing the entire section of drywall. The repair involves removing the failed tape, preparing the surface, and re-embedding fresh tape with new joint compound. For short sections of peeling tape under one foot, a targeted patch repair is enough. For longer runs of tape that have separated along an entire seam or ceiling joint, re-taping the full length gives a more reliable and longer-lasting result.
Peeling drywall tape is not a structural emergency. It will not cause your wall to collapse, and it does not mean the drywall itself is failing. However, leaving peeling tape unrepaired does create a pathway for moisture infiltration, especially along ceiling seams and in areas near bathrooms or exterior walls. According to a drywall repair guide from MBM Building Materials, peeling drywall tape that goes unrepaired can allow moisture to enter the seam and lead to mold growth and further surface deterioration. Fixing it promptly saves you from a larger repair later.
Why Is Drywall Tape Lifting? The Most Common Causes
Drywall tape is lifting because the bond between the tape and the joint compound beneath it has failed. The four most common causes of this failure are poor original application, moisture or high humidity, house settlement, and the use of low-quality materials.
Poor application is the leading cause of tape failure in newer homes. According to New Ceilings Painting and Drywall, peeling drywall tape is most common in newer homes due to poor application technique. This means the original drywall installer applied either too much or too little joint compound beneath the tape before embedding it. Too little compound and the tape has no adhesive bed to grip. Too much and air pockets form underneath as the compound dries, causing the tape to bubble, blister, and eventually lift away from the surface.
Moisture and high humidity are major factors for homes in Lexington, SC and across the Midlands region. According to USG, the manufacturer of one of the most widely used drywall finishing systems in North America, humidity and moisture cause hygrometric movement in wall and ceiling materials. When moisture is absorbed and released by the drywall paper, the materials expand and contract, which puts stress on the tape bond. According to Handyman on Call, if you see tape peeling in multiple locations throughout your home rather than just one spot, widespread moisture infiltration or a humidity problem is the most likely cause and should be investigated before simply repatching.
House settling is another cause. As a home’s foundation, framing, and sheathing shift over time due to seasonal soil moisture changes, temperature swings, and the natural settling process of new construction, small movements travel through the wall structure and pull tape loose at seams and joints. According to Buyers Ask, a home inspection resource, truss uplift, seasonal slab movement, and expansive soil conditions can all produce enough structural movement to cause tape failure at drywall joints. Homes in the Lake Murray and Gilbert areas of South Carolina, where soil moisture levels fluctuate significantly between wet and dry seasons, sometimes see tape failure specifically tied to seasonal building movement.
Why Is Drywall Tape Coming Off the Ceiling in a Garage?
Drywall tape is coming off the ceiling in a garage because garages are among the most temperature and humidity-extreme spaces in any home, and they typically have no climate control. According to the Edna Wilson painting and drywall resource, garage ceilings and patios are particularly vulnerable to tape peeling because the combination of high temperatures in summer and moisture exposure compromises the adhesive properties of the tape and the joint compound beneath it. In South Carolina garages, summer temperatures can exceed 100 degrees Fahrenheit in the ceiling area, which causes joint compound to dry out and shrink, pulling the tape bond apart over time. If you are seeing tape come down from a garage ceiling, the repair process is the same as for interior walls, but you will need to seal the repaired seam with a moisture-resistant primer before painting because the temperature swings will continue to stress the repair.
What Causes Ceiling Tape to Peel?
Ceiling tape peels because gravity adds downward stress to the tape bond, and ceiling seams are more exposed to humidity, heat, and building movement than wall seams. According to USG’s technical guide on environmental conditions and drywall finishing, thermal and hygrometric movement is most pronounced in ceiling areas because heat rises and collects there. This ongoing cycle of expansion and contraction weakens the bond between tape and compound faster than on vertical wall surfaces. Ceiling tape that was applied without enough joint compound behind it, or that was applied while the drywall paper was even slightly damp, fails faster than properly applied tape. In Lexington area homes with high ceilings or unconditioned attic spaces above, ceiling tape can begin showing signs of failure within 5 to 10 years of installation if original application was not done correctly.
How to Fix Peeling Drywall Seam Tape Step by Step
To fix peeling drywall seam tape, follow this process from start to finish: assess the damage, remove the failed tape, clean and sand the surface, apply a bed coat of joint compound, embed new tape, apply finish coats with feathering, sand flush, prime, and paint. Taking each step in the correct order is what determines whether the repair lasts or whether the tape fails again within a year.
Step 1: Assess How Much Tape Has Failed
Before touching anything, run your hand along the seam and press lightly along the tape in both directions from the visible peeling area. If the tape gives, bubbles, or feels hollow beneath your fingers, the failure extends further than what you can see. According to the Home Living Handbook drywall repair guide, if the peeling is localized to a few inches, you can repair only that section. For anything larger than one foot, or for any section where the tape feels loose beyond the visible damage, re-tape the full length of the seam for a durable result.
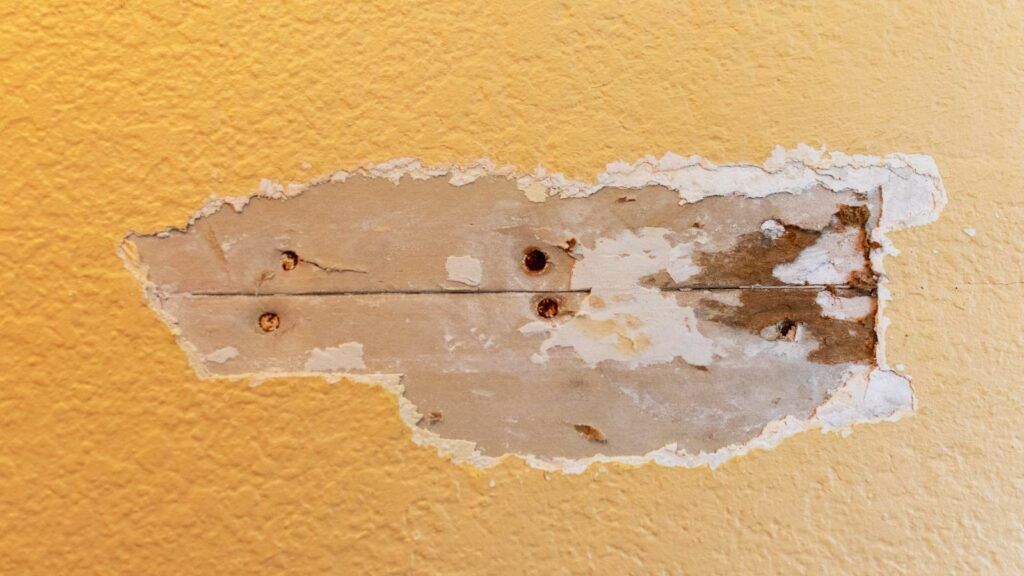
Step 2: Remove the Failed Tape
Using a sharp utility knife, score along both edges of the loose tape. Carefully peel the failed tape back from the wall, working slowly to avoid tearing into the drywall paper below. If any tape is still firmly bonded and shows no signs of bubbling, you can leave it in place and feather new compound over the transition. Remove only what is genuinely loose. According to Drywall Central’s repair guide, aiming for a clean removal without damaging the underlying surface makes it easier for the new tape to adhere properly and for the finished repair to blend into the wall.
Step 3: Sand and Clean the Exposed Surface
After removing the loose tape, use 100 to 120 grit sandpaper to smooth the exposed joint compound, feathering down any raised edges where the old tape used to sit. Wipe away all dust with a dry cloth. This step is critical. Dust and debris left on the surface will prevent new compound from bonding properly. The surface should feel uniform and smooth before any new material goes on. If there are any ridges from dried compound at the tape edges, these need to be sanded flat or the new tape will bridge over them and create a bump in the finished repair.
Step 4: Apply a Bed Coat of Joint Compound
Using a 4- to 6-inch drywall knife, apply a smooth, thin layer of all-purpose joint compound directly over the seam where the tape will go. This bed coat is the adhesive layer that holds the new tape to the wall. It should be thin enough to cover the seam evenly without excess buildup. According to ProForm Finishing Products, a brand affiliated with National Gypsum Company, the bed coat needs to be smooth and even, and the seam surface should be clean and free of dust before application to allow the tape to bond properly.
Step 5: Embed New Tape Firmly
Immediately press new tape into the wet bed coat. Center it over the seam and press it flat with your knife, working from the center outward toward each end to push out any air bubbles. Do not allow any air pockets to remain under the tape. A bubble under tape is the beginning of the next failure. Run your knife firmly along the tape at an angle, squeezing excess compound out from the edges. According to Family Handyman’s guide on mesh versus paper drywall tape, paper tape requires this careful embedding technique because it needs the compound beneath it for adhesion. Mesh tape with its self-adhesive backing can be pressed directly to the surface first, but still needs a setting-type compound applied immediately after for structural strength.
Step 6: Apply Finish Coats and Feather the Edges
Once the bed coat and tape have dried completely, which takes at least 24 hours depending on humidity and temperature, apply a second coat of joint compound over the tape. This coat should extend 2 to 3 inches beyond the tape edges on each side, feathering thin as it spreads away from the seam. A third coat may be needed to make the repair fully flush with the surrounding wall surface. According to MBM Building Materials, each coat needs to be feathered progressively wider so the transition from the repaired area to the surrounding wall becomes invisible. Apply each coat thinner than the last. Joint compound shrinks as it dries, so what looks flush when wet will look slightly sunken once dry, which is why feathering wider with each pass is the right technique.
Step 7: Sand Flush and Prime Before Painting
After the final coat has dried, sand the entire repair area with 120 grit sandpaper using a sanding sponge or block. Sand until the repaired section is perfectly flush with the surrounding wall. Run your hand across the surface in different directions to check for bumps or ridges you may have missed. After sanding, wipe all dust away and apply a coat of drywall primer before painting. According to Drywall Central’s repair guide, priming is essential because it seals the fresh joint compound, which is absorbent, and prevents the paint from soaking in unevenly. Without primer, the repaired section will appear as a flat, dull patch against the surrounding painted wall even after multiple finish coats.
Once the primer is dry, apply the finish paint. If you are matching an existing color, painting the entire wall rather than just the patch gives the most seamless result. Spot-painting a repair on an older wall almost always results in a visible sheen difference between the patched area and the surrounding surface, regardless of how carefully the color is matched. Complete drywall repair and painting handled together as one connected process delivers the most invisible finish.
Is It Better to Wet or Dry Drywall Tape Before Applying?
It is better to wet paper drywall tape slightly before embedding it in joint compound rather than applying it dry, but only for paper tape used on inside corners. Wetting paper tape for 10 to 15 seconds before embedding makes it more flexible, allows it to fold cleanly at the center crease for corners, and helps it conform to the surface without wrinkling. According to Handyman on Call, you can avoid bubbling and wrinkling issues by wetting paper tape before embedding it in compound. For flat seam repairs on walls and ceilings, most professionals simply embed dry paper tape directly into the bed coat of compound and use firm knife pressure to remove air. Mesh tape should never be pre-wetted as it is self-adhesive and wetting it reduces the effectiveness of the adhesive backing.
What Is the Best Tape for Drywall Seams?
The best tape for drywall seams depends on the specific application. Paper tape is slightly stronger overall and is the preferred choice of professional drywall finishers for flat seams, butt joints, and inside corners because it firms up dramatically after embedding, creating a near-rigid bond that resists cracking. According to Family Handyman’s guide comparing mesh and paper drywall tape, paper tape is especially good for butt joints and high-stress seams because it creates a stronger bond than mesh once embedded properly.
Fiberglass mesh tape is easier for beginners to apply because it is self-adhesive, requires no bed coat to stick in place, and is more resistant to moisture, making it a better choice for bathrooms, garages, and any humid space. According to Surface Shields, a building materials resource, paper tape creates a stronger bond and is more resistant to cracking, while mesh tape has a more manageable learning curve and better moisture resistance. If you use mesh tape for a repair, always pair it with a setting-type joint compound rather than standard pre-mixed compound. Setting compound dries through a chemical reaction rather than water evaporation, which gives the mesh repair the firmness it needs to resist future cracking.
The table below summarizes when to use paper versus mesh tape for common repair situations.
| Situation | Best Tape Choice | Compound to Use |
|---|---|---|
| Flat wall seam repair | Paper tape | All-purpose or setting compound |
| Inside corner repair | Paper tape (pre-folded) | All-purpose compound |
| Ceiling seam repair | Paper tape or mesh | Setting compound for mesh; all-purpose for paper |
| Garage or high-humidity area | Fiberglass mesh | Setting compound only |
| Short crack or hole patch | Fiberglass mesh | All-purpose or setting compound |
| Butt joint (most stressed seam) | Paper tape | Setting compound for bed coat, all-purpose for finish |
Sources: Family Handyman Mesh vs. Paper Tape Guide; Surface Shields Drywall Tape Comparison; National Gypsum ProForm Paper Joint Tape Best Practices; Drywall Central Peeling Tape Repair Guide
Can Taped Seams Be Repaired Without Replacing Drywall?
Yes, taped seams can be repaired without replacing drywall in most cases. As long as the drywall panel itself is structurally sound, has no soft spots from water damage, and shows no signs of mold or crumbling paper facing, a tape-only repair is all that is needed. The drywall does not need to come down just because the tape has failed. The tape is a surface treatment, not a structural component. It can be removed and replaced without touching the panel underneath.
The exception is when peeling tape is accompanied by soft, spongy, or dark-stained drywall behind it. If the panel feels soft when pressed, has visible mold, or has dark staining that does not clean off with a dry cloth, the drywall has been compromised by sustained moisture. In this case, the panel section needs to be replaced, not just re-taped. Painting or re-taping over water-damaged drywall is a temporary fix that will fail quickly and allow mold to continue spreading behind the surface.
When the damage goes beyond tape and the drywall panel itself needs repair or replacement, professional sheetrock installation and repair handles the full scope from panel replacement through texture matching and painting, so the finished result blends seamlessly with the surrounding wall.
Is It Normal for Drywall Tape to Crack?
Yes, it is normal for drywall tape to crack over time, especially along ceiling seams, at butt joints where two drywall panels meet end-to-end, and in any area subject to building movement. According to USG’s technical documentation on drywall finishing and environmental conditions, thermal and structural movement of building components is one of the main reasons tape cracks after installation. Buildings expand and contract with temperature and humidity changes throughout the year. Joint compound is rigid once dried, which means it cracks rather than stretching when the wall moves slightly beneath it.
A hairline crack along a seam is not the same as tape that is bubbling, lifting, or peeling. A hairline crack can be filled with a thin coat of joint compound, feathered smooth, re-primed, and painted. Tape that is bubbling or lifting requires removal and re-embedding as described above. According to Home Living Handbook, if seam cracks keep returning in the same location after repair, the home likely has ongoing foundation shifts or structural movement that is exceeding what the tape system can accommodate. In this case, the underlying structural issue should be evaluated before additional cosmetic repairs are made.
How to Fix a Sheetrock Tape Bubble on a Ceiling
To fix a sheetrock tape bubble on a ceiling, use a utility knife to carefully slice the center of the bubble and peel back the edges. Scrape out any loose or dried compound from beneath the tape flap. Apply fresh joint compound into the cavity under the bubble and press the tape back flat, squeezing out any air with your knife. If the tape is too dry or damaged to lie flat after wetting and pressing, cut the affected section out entirely and re-tape it. Bubbles on ceilings are more stubborn than those on walls because gravity pulls the tape down instead of letting it lie flat against the compound. Apply tape on ceilings in shorter working sections and use firm, consistent knife pressure to keep the tape in full contact with the bed coat until the compound begins to set.
How to Hide Drywall Tape Seams
To hide drywall tape seams, apply three progressively wider and thinner coats of joint compound, feathering each coat 2 to 3 inches further than the last on both sides of the seam, then sand perfectly flush and prime before painting. A seam that is visible after painting is almost always caused by one of three things: not enough feathering in the compound coats, not sanding flush, or skipping primer before painting.
Feathering is the key technique. The first coat sits directly over the tape and is only slightly wider than the tape itself. The second coat extends 2 to 3 inches beyond the first. The third coat extends another 2 to 3 inches beyond the second, becoming so thin at the outer edges that it is nearly transparent. This graduated build creates a smooth transition from the thickest point over the tape to the flat wall surface, making the seam disappear once sanded and painted.
Skipping primer is the single most common reason a repaired seam shows through paint. Fresh joint compound is highly porous and absorbs paint at a different rate than the surrounding painted wall. This creates a flat, dull spot called “flashing” that is visible even when the color matches perfectly. One coat of drywall primer seals the compound and equalizes the absorption rate, which makes the seam invisible after finish paint is applied.
How to Fix When Tape Pulls Paint Off a Wall
When tape pulls paint off a wall, the underlying issue is almost always that the paint did not fully bond to the surface beneath it. This happens when paint is applied over unsealed drywall compound without primer, when paint is applied over a glossy surface without scuffing, or when paint is applied too soon after a repair before the compound has fully dried and cured. To fix the area, lightly sand the damaged surface, apply a thin skim coat of joint compound to fill any gouges left by the pulled paint, let it dry fully, prime the entire repaired section, and repaint. Going forward, always allow joint compound to cure for a full 24 hours before priming, and never skip the primer step before painting repaired areas.
Why Do You Put Dawn Dish Soap in Drywall Mud?
Dawn dish soap is added to drywall joint compound by some professionals because it acts as a surfactant, reducing the surface tension of the compound and making it spread more smoothly, especially on the final coat. According to a detailed discussion on Fine Homebuilding, dish soap acts as an emulsifier and wetting agent that helps the compound penetrate the paper surface and may reduce the small pinhole air bubbles that sometimes appear when applying finish coats over painted or previously finished walls. The result is a slightly creamier mud that floats out more easily and sands more smoothly after drying.
However, there are strong reasons to be cautious with this practice. According to multiple professional drywall finishing forums, including discussions on Drywall Talk and Contractor Talk, USG and National Gypsum do not recommend adding soap to their joint compounds and have stated they will not support warranty claims on products where the compound was modified. Adding too much soap, which most professionals define as more than a small drop per 5-gallon bucket, can cause the compound to become too soft, reduce adhesion, and create problems with paint sticking later. If you do add dish soap to your final skim coat, use the absolute minimum quantity, and never add it to the bed coat or any layer that goes directly beneath tape where adhesion is critical.
Can You Use Kilz to Seal Torn Drywall Paper?
Yes, you can use Kilz to seal torn drywall paper before applying joint compound and painting. When the paper facing on drywall is torn, sanded through, or damaged, the exposed gypsum core is extremely absorbent and will cause joint compound to shrink, crack, and fail to adhere properly if applied directly over the raw surface. Applying Kilz original or Kilz PVA Drywall Primer to the torn area seals the gypsum, reduces absorption, and creates a stable surface for joint compound and paint to bond to. Allow the Kilz to dry completely before applying any compound. This same approach applies after any area of drywall paper has been accidentally sanded through during a repair. Sealing the raw gypsum before recoating prevents the absorbed moisture from the compound from reactivating the gypsum and causing bubbling.
What Are Common Drywall Tape Mistakes?
The most common drywall tape mistakes are applying too little joint compound behind the tape before embedding, not removing air bubbles during embedding, applying compound in coats that are too thick, not feathering the edges wide enough, rushing drying time between coats, sanding before the compound has fully dried, and skipping primer before painting. According to Drywall by Renso, a professional drywall finishing resource, bubbling and wrinkling occur when compound is applied too thickly or when insufficient pressure is used during tape smoothing to push out air pockets. These problems compound over time. A bubble that forms during original installation but is painted over will eventually push the paint up, peel the tape, and require a full re-tape repair.
Using the wrong type of compound is another common mistake. Standard pre-mixed all-purpose compound is the right choice for most finish coats. But for the bed coat where mesh tape is being embedded, a setting-type compound is required. Setting compound dries through a chemical reaction and produces a harder, more rigid bond. Using standard pre-mixed compound as the only coat beneath mesh tape is one of the most frequently cited causes of cracked mesh tape repairs according to professionals in drywall finishing forums.
Homeowners who attempt drywall tape repairs themselves often see the repair hold for a few months before failing again in the same spot. This is almost always because the root cause of the original tape failure, whether that is ongoing moisture, inadequate original compound application, or building movement, was not addressed before re-taping. If the same seam fails twice, the underlying cause needs to be identified and corrected. Interior painting done over a wall with recurring tape issues will always show the problem through the finish, no matter how well the paint itself is applied.
Frequently Asked Questions
Why Is Drywall Tape Peeling in My Lexington, SC Home?
Drywall tape is peeling in your Lexington, SC home most likely because of moisture, original application error, or house settlement. South Carolina’s hot, humid summers create exactly the conditions that cause joint compound to lose its bond with the tape over time. According to USG’s technical documentation on drywall finishing, humidity causes hygrometric movement in drywall materials, which stresses the tape bond and causes it to lift. If peeling tape appears in only one location, poor original application is the most likely cause. If it appears in multiple rooms or along ceiling seams throughout the home, moisture or building movement should be investigated.
How Long Does It Take for Drywall Tape Repairs to Dry?
Drywall tape repairs typically take 24 hours per coat to dry under normal conditions of 65 to 75 degrees Fahrenheit and moderate humidity. In Lexington and the Midlands area during humid summer months, drying time can extend significantly, especially in rooms without air conditioning or good airflow. According to MBM Building Materials, drying can take up to 36 hours in humid conditions. Running a fan in the room and keeping the HVAC system active speeds up drying considerably. Never apply the next coat of compound or begin sanding until the previous coat is completely white and dry to the touch throughout, not just on the surface.
Can I Paint Directly Over Peeling Drywall Tape?
No, you cannot paint directly over peeling drywall tape and expect a lasting result. Painting over peeling tape only hides the problem temporarily. Within weeks or months, the paint will blister and peel in the same area as the tape beneath it continues to fail. According to Drywall Medic, painting over peeling tape will just make the area look worse over time. The tape must be removed, the surface must be repaired and re-taped properly, and primer must be applied before any finish paint goes on for the repair to be permanent.
How Do You Stop Tape from Peeling in Humid Areas Like Bathrooms?
To stop tape from peeling in humid areas like bathrooms, use fiberglass mesh tape embedded with setting-type compound rather than standard pre-mixed joint compound, apply a moisture-resistant or mold-resistant primer before painting, and use a paint with built-in mold and moisture resistance for the finish coat. According to Drywall by Renso, using a dehumidifier in humid environments during application improves adhesion significantly. For bathroom ceilings and walls near showers, making sure exhaust fans are adequate and functioning properly reduces the ongoing moisture exposure that causes tape bonds to fail in these spaces.
Does Drywall Tape Repair Affect Home Value in Lexington, SC?
Yes, visible drywall tape issues do affect home value in Lexington, SC. Peeling, bubbling, or cracked tape seams are considered deferred maintenance items that home inspectors document and buyers use as negotiation points. A well-executed drywall repair that is properly primed and painted leaves no visible trace and has no impact on value. But a wall with visible tape failure signals to buyers that the home has not been well maintained, which affects buyer confidence and offers. Professional drywall repair done before listing is one of the most cost-effective improvements available for sellers in the Lexington and Columbia market.
How Much Tape Do You Need for a Drywall Seam Repair?
For a drywall seam repair, cut tape to match the exact length of the seam being re-taped, plus 2 to 3 inches of overlap at each end. A standard 250-foot roll of paper drywall tape or a 300-foot roll of mesh tape is more than enough for most single-seam or single-room repair projects. Buy slightly more than you think you need so you are not cutting tape short mid-repair. Short tape that does not fully cover the exposed seam creates a gap that will crack and peel again from the endpoint.
When Should You Call a Professional for Drywall Tape Repairs in Lexington, SC?
You should call a professional for drywall tape repairs in Lexington, SC when the peeling is extensive across multiple seams or rooms, when the tape failure is accompanied by soft drywall, water staining, or mold, when the same seam keeps failing after repeated repairs, or when the repair involves ceilings in high rooms where matching the existing texture requires specialized tools and experience. Professional drywall repair painting services handle everything from tape removal through texture matching and finish painting, making repairs invisible rather than simply covered up.
Final Thoughts
Repairing peeling drywall seam tape is a straightforward process when each step is done correctly and in the right order. Remove the failed tape cleanly, sand the surface smooth, apply a proper bed coat, embed new tape without air pockets, build up the finish coats with progressive feathering, sand flush, prime, and paint. Skipping any of these steps is what turns a simple repair into one that fails again within the year. The most common reason tape repairs fail is not the repair itself but the lack of primer between the compound and the paint, or a root cause like ongoing moisture or building movement that was never addressed. Homeowners in Lexington, South Carolina face particularly challenging conditions for drywall tape longevity due to the hot, humid climate and seasonal building movement common across the Midlands region.
If your home has multiple seams peeling, tape coming off ceiling areas, or areas where previous repairs have failed and the problem keeps returning, the team at Soda City Painting serves Lexington, Red Bank, Gilbert, and the surrounding Columbia area with professional drywall repair and painting that makes patches completely invisible. BBB accredited, licensed, and insured, they handle everything from targeted seam repairs through full-wall prep and painting. Contact them today for a free estimate and get your walls looking right again.